A Raspberry Pi powered Magic Mirror
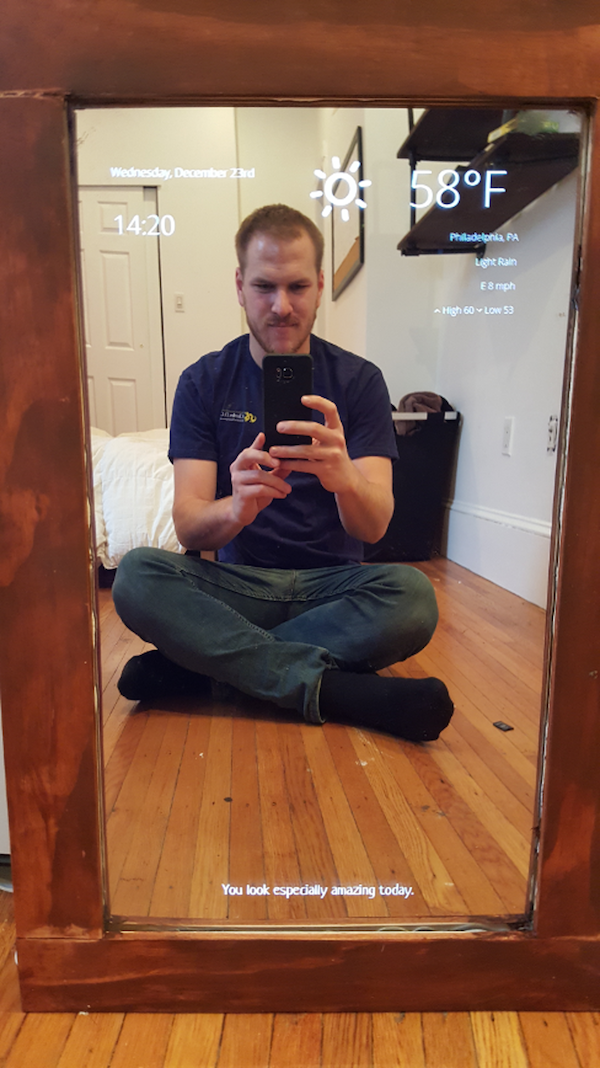
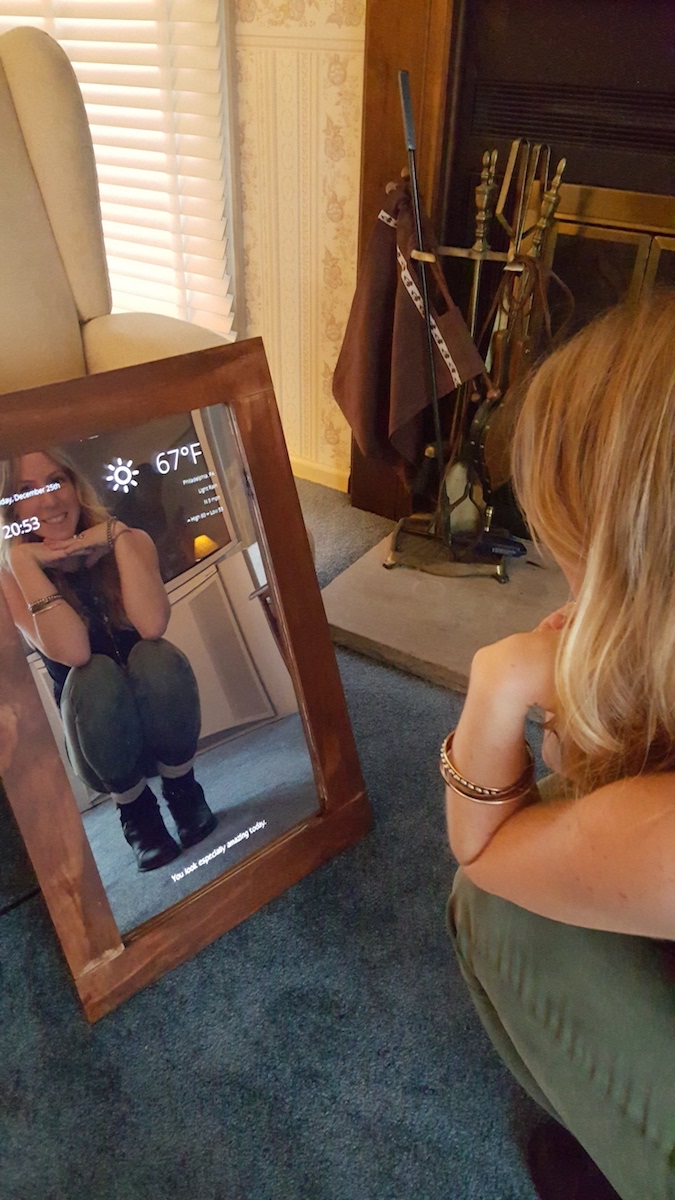
A magic mirror is a raspberry pi powered monitor behind a double sided mirror. A mostly black web page allows you to add some widgets to the mirror’s reflection as if by magic. This version includes widgets for displaying the weather forecast, the date/time and a nice randomly generated greeting. No low level hardware hacking required, just some basic woodworking and some code I’ve already put together.

What you’ll need
- A monitor
- A double sided acryllic mirror fit to the size of the monitor
- A few 2 x 4’s to build a case around the monitor
- Thin wood to build the forward facing mirror frame, I used 1/8 x 3’ board
- A raspberry pi and it’s needed components, i.e. the power supply, HDMI cord, wifi usb dongle, and a keyboard for initial setup
- Or just buy a complete CanaKit Raspberry Pi 3 kit for convienence so you don’t have to buy individual parts.
- Basic woodworking tools like a saw, sander, screwdriver
- Screws, liquid nails
Choosing the monitor
The size of the mirror is really dictated by the kind of monitor you get. I wanted to get something large as possible but also with a removeable arm so it could fit inside of a case. Another important aspect is making sure you get a monitor with the inputs towards the center of the monitor rather than the sides.
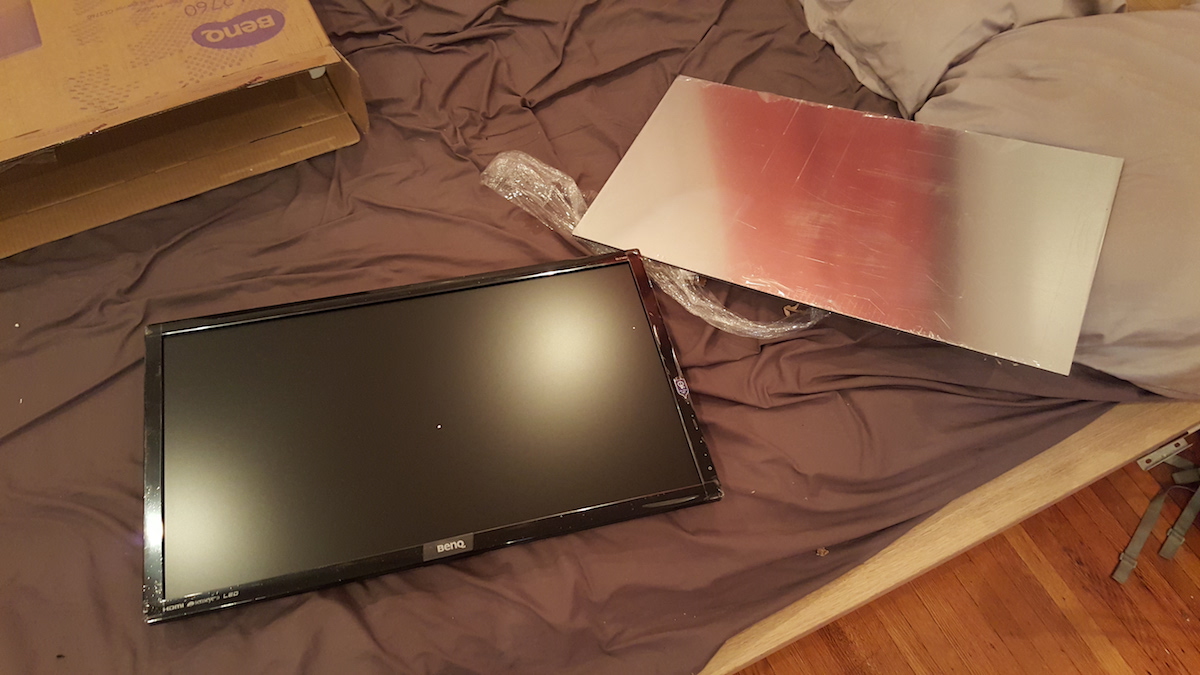
I was cautious to get a monitor with it’s inputs on the bottom or side because it would be hard to make the frame to fit and have the raspberry pi’s HDMI cord also fit. I ended up picking the BenQ GW2760HL 27 inch monitor. Turned out perfect for the job.

Getting the Mirror
The mirror is definitely the most essential piece to the whole project. However what I didn’t know was that these double sided mirrors are actually acryllic and plastic like. They’re much more forgiving than actual mirrors and you can cut them in several different ways to fit what you need. So order a mirror that’s close to the size of your monitor (only the screen part, do not include the bezel in your measurement). But don’t worry too much about ordering slightly too big, you can cut to fit the size you need.
I ordered my mirror from TAPPlastics.com but you can get them from several other vendors online. This is the exact product I ordered.

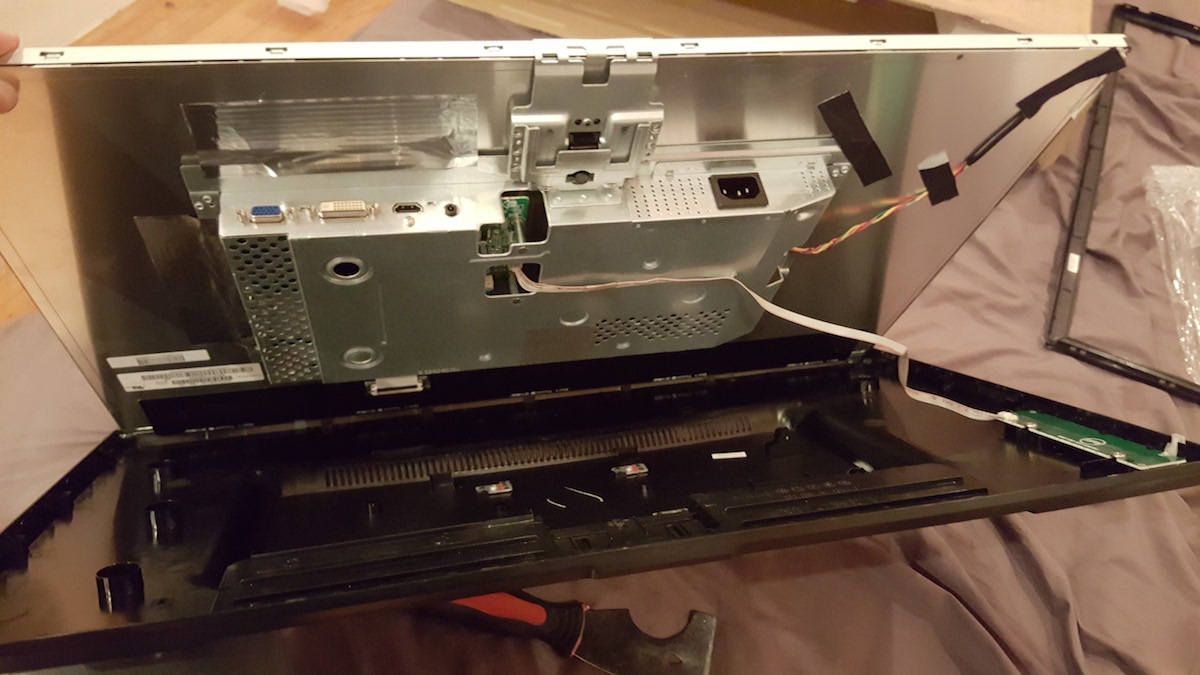
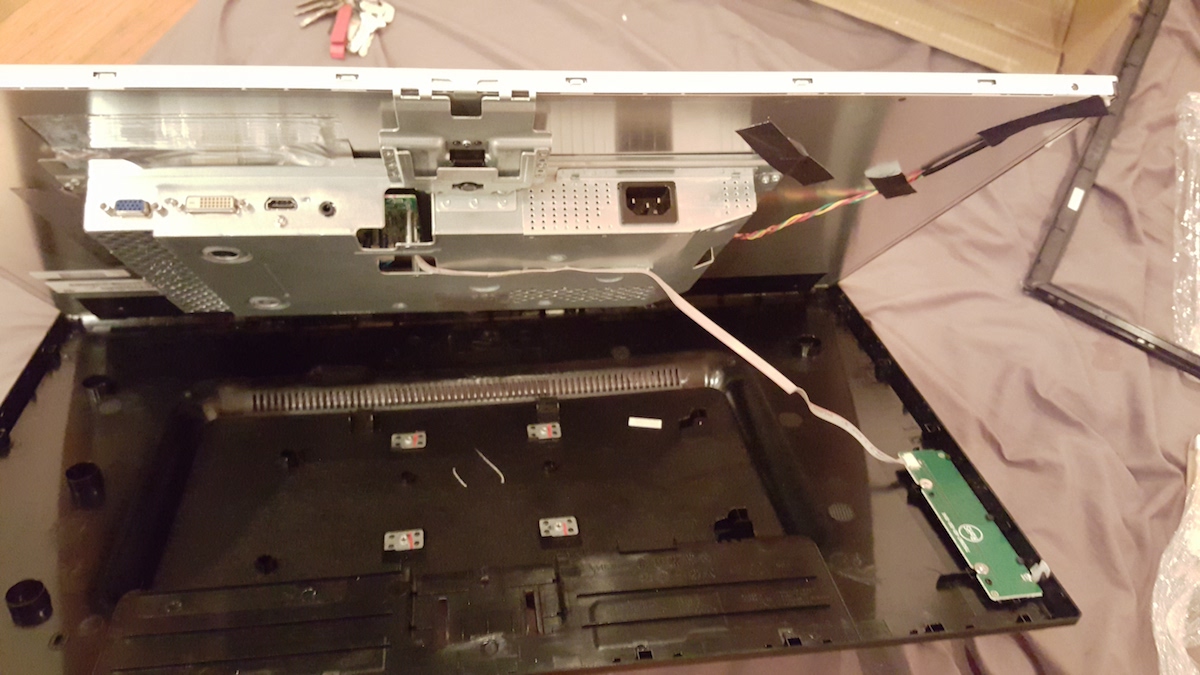
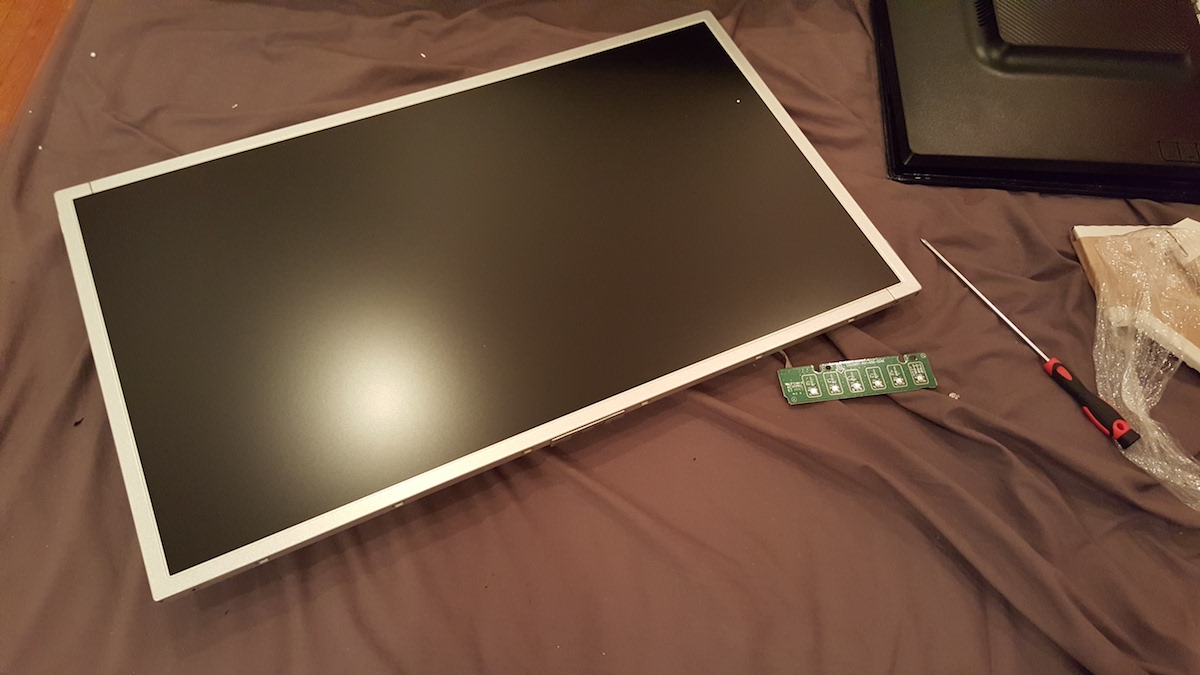
Removing the monitor’s bezel (optional)
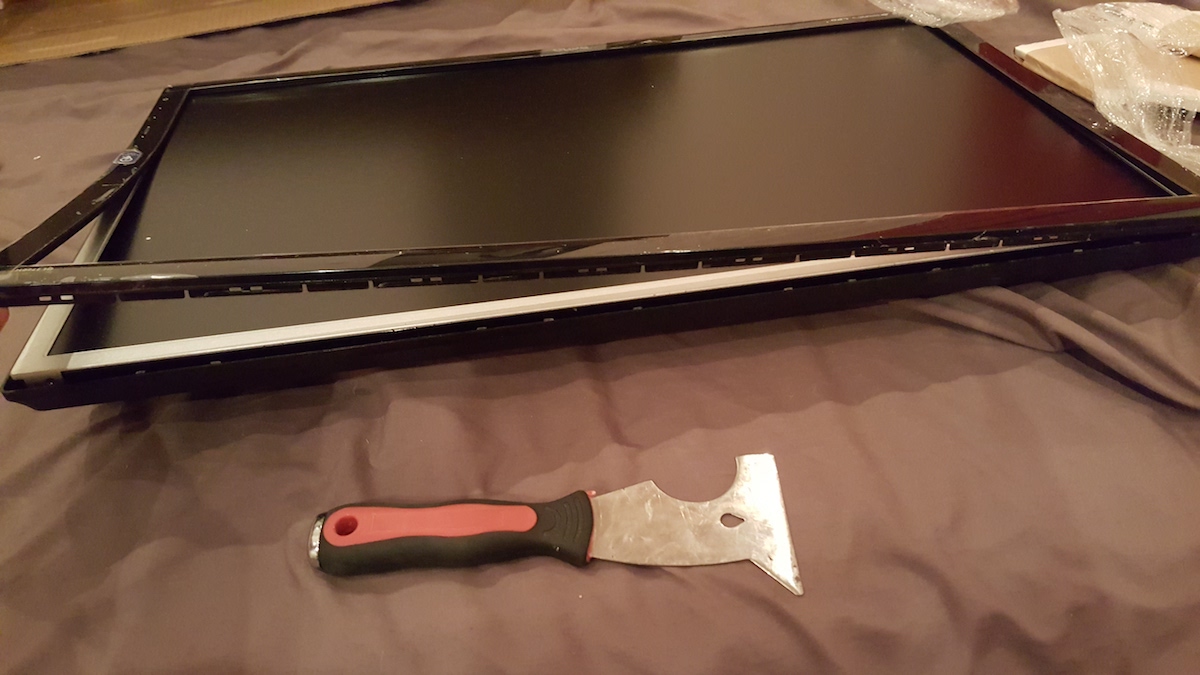
I decided to make the case fit even closer to the monitor by removing the plastic around the monitor. Turned out to be a good call because at first I didn’t take in for account the depth space I’d need to fit in all the wiring. I used a paint scraper to pry at the edges of the monitor till it eventually gave in and split.
Make sure to be careful removing the monitor controls. They’re wiring is very thin and you’ll definitely need it intact to turn on and adjust the monitor.
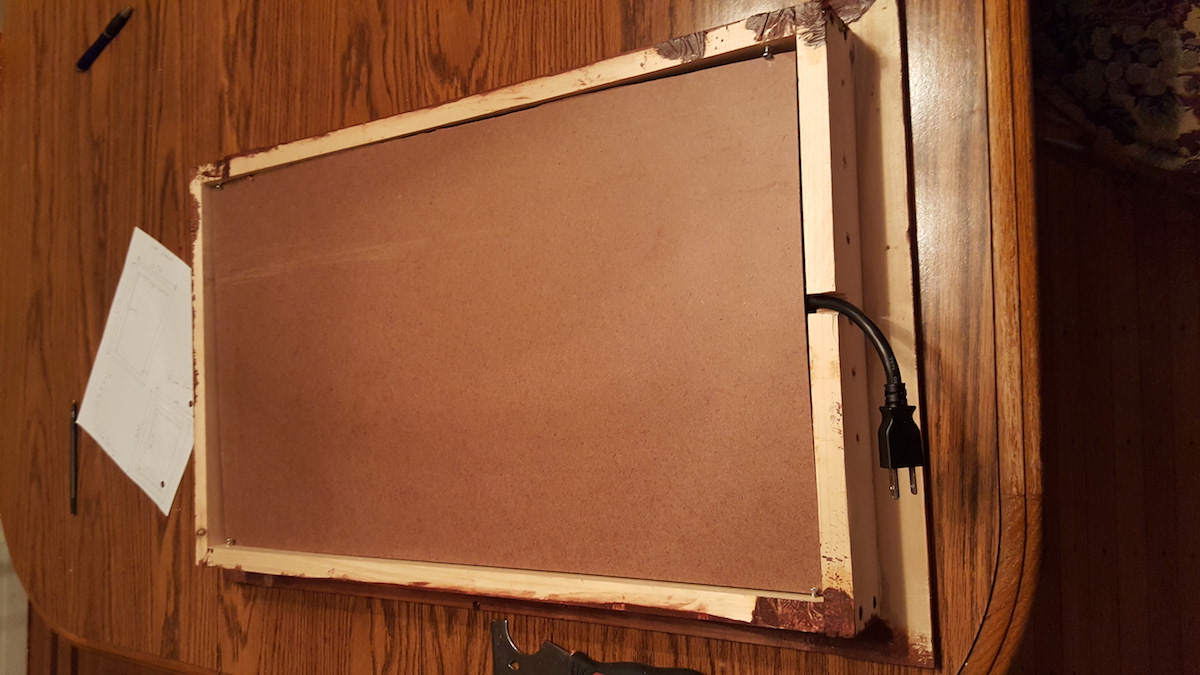
Building the case
Nothing super exciting here. I just cut 4 4x2 pieces to fit the new Jenny Craig’d monitor in a case. I used a few clamps to hold the pieces in place while screwing in the sides. With this method you’ll get a flush fit and be able to remove the montior from the case with no issues.
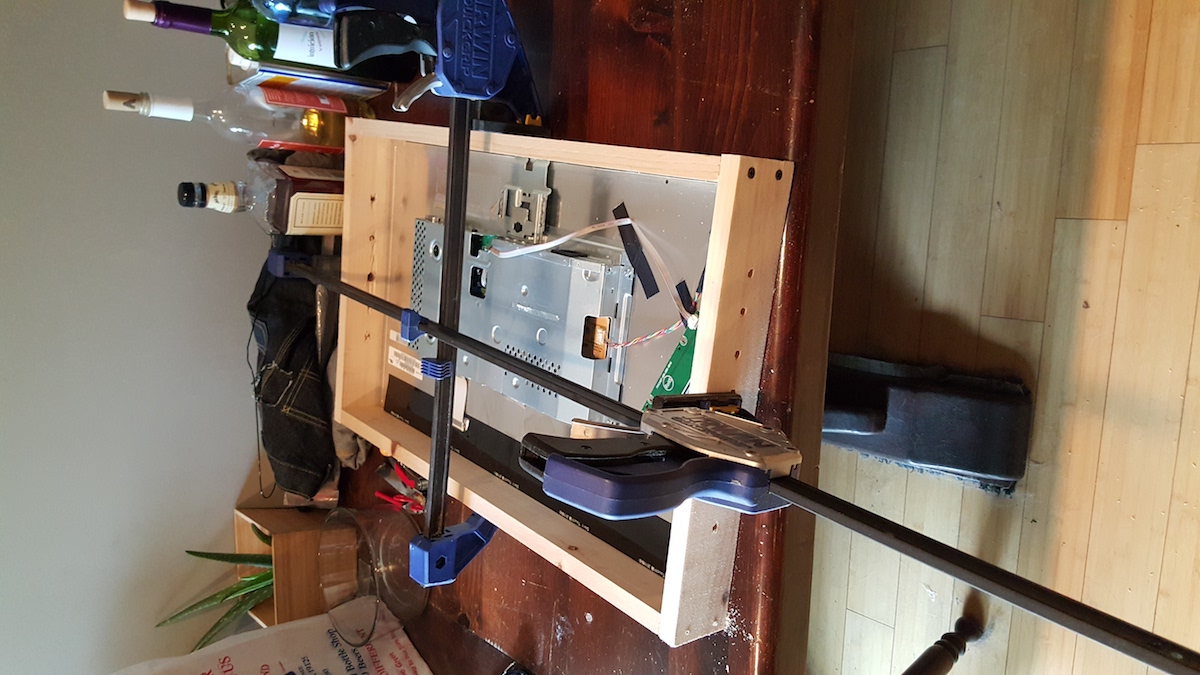
A side note, I also screwed in holes at the top and bottom of the case. This was to allow the raspberry pi to at least have some air flow. You don’t want your computer to bake in a completely enclosed space.
Final side note, remember to make one of those holes at the bottom of the case big enough for a power plug to fit through. You’ll need it later when you’re wiring up your monitor and raspberry pi’s power through the case. I ended up just using a straight saw and making a slot to fit the cable through.
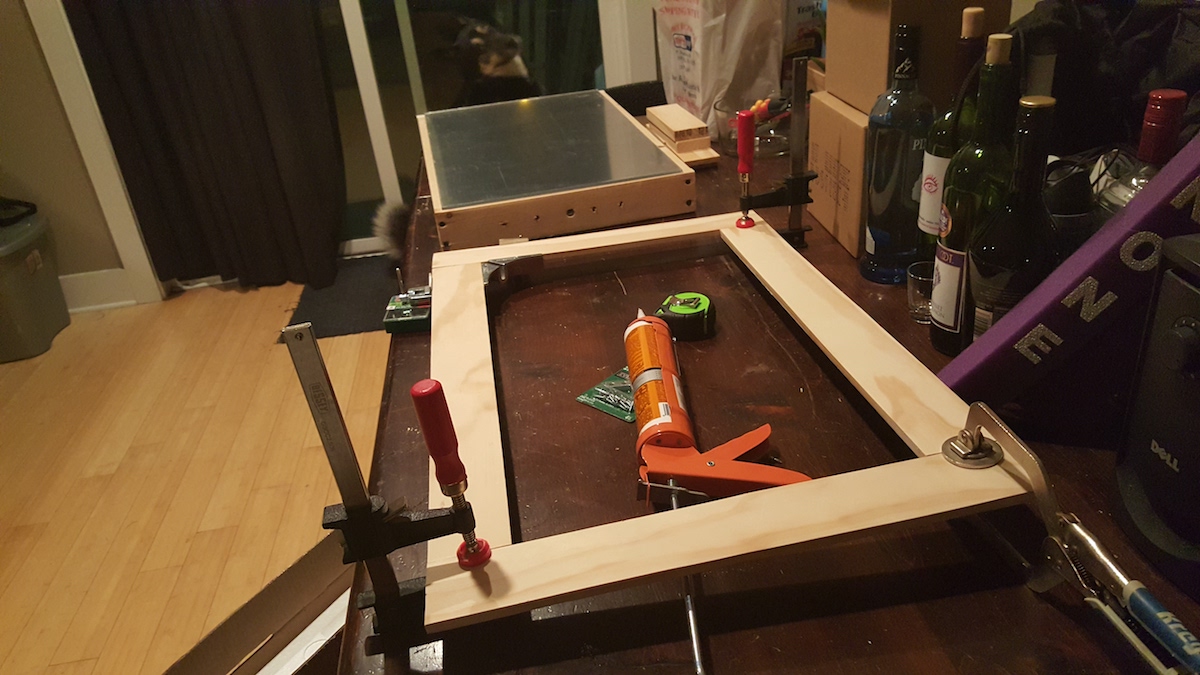
Building the frame
At first I wanted to make a fancy frame with 45 degree angles at each of the corners. Key phrase: at first. Remember when I said I wasn’t an expert craftsman? Yea, that bit me a little bit. I didn’t get pieces long enough to make that kind of cut possible. Instead I said I was a “minimalist” and wanted simple cuts 90 degree cuts on purpose.
But another snag, originally the plan was to use a kreig jeg to make little pocket holes to screw in. But however 3/8 thick wood, just like jihadst groups, are cowardly and easily splintered under the slightest pressure. But luckily a helpful employee at Home Depot showed me this awesome tool:

Now I could just use some liquid nails at the joints and this tool would hold them for a few hours to let them dry. No screws required. My only regret is not buying two so I could get this part done twice as fast.
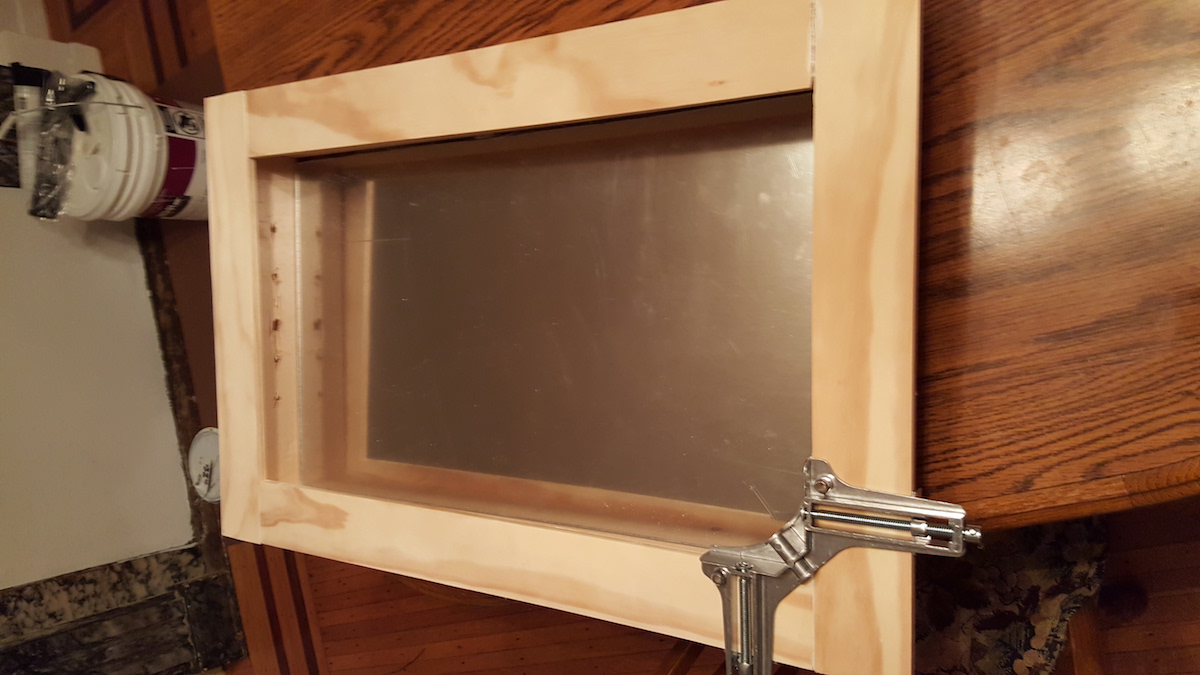
Attaching the frame to the case
This part of the project I thought the least about and when I make another I’ll definitely do it differently. Essentially I was in a bit of trouble because the mirror didn’t fit flush with the frame, causing a gap between the case and frame. Luckily it’s really easy to cut a double sided mirror. You can do it a number of ways, TAPPlastics has a whole tutorial series on it.
I happened to have a band saw available and put that puppy to use. My only word of advice here is taken from Will it Blend? : “Don’t breathe this”. By this I mean the plastic dust.

Now it fits flush to the frame and case.
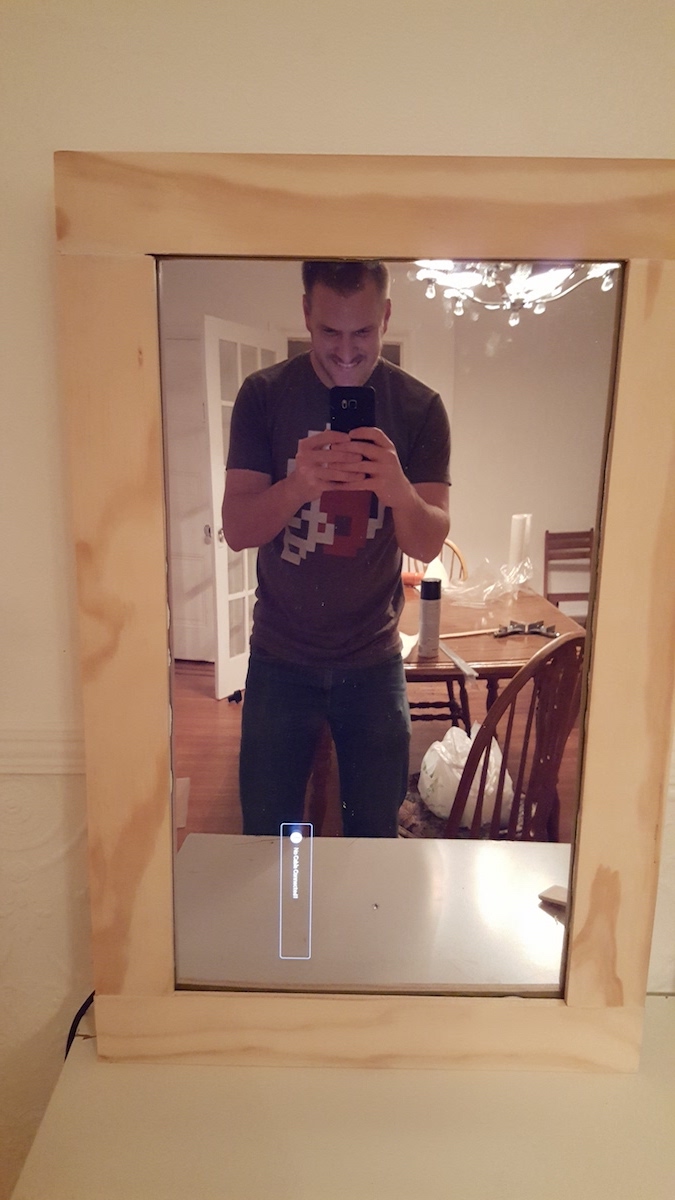
Another pitfall I made was to not stain the frame and case separately before gluing the mirror between them. I don’t have pictures but I ended up using painters tape to cover the mirror and stain around the edges.
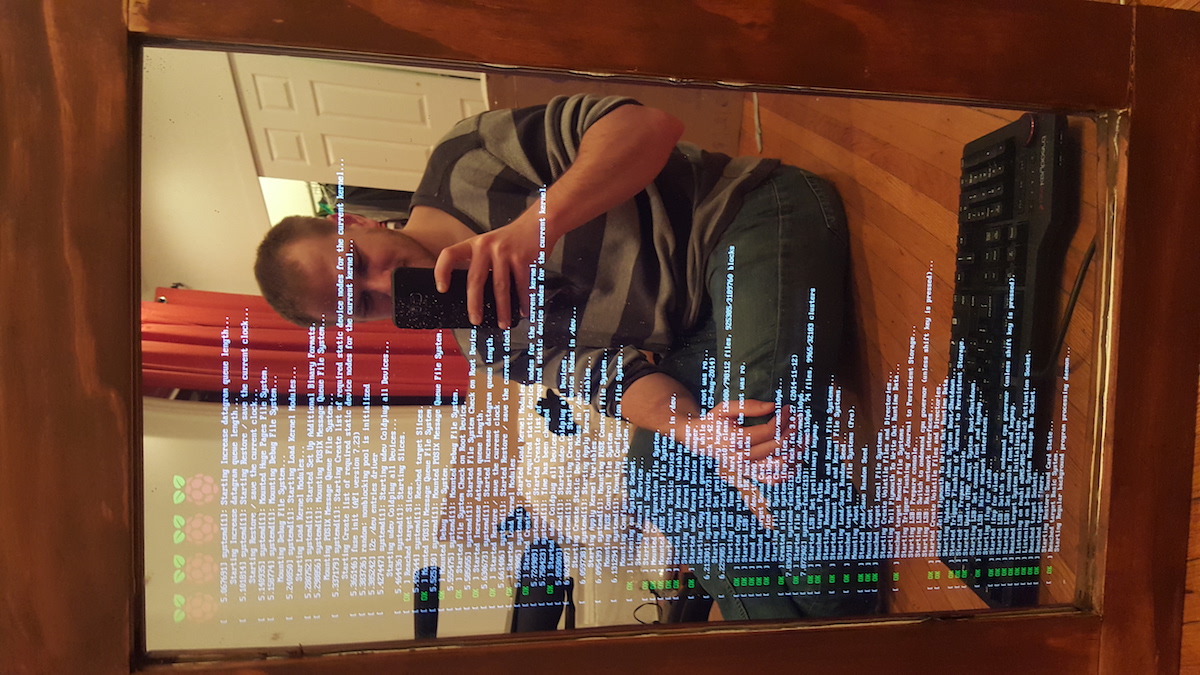
But volia! A mirror that allows light to shine through it. Right now that light is monitor diagnostic text but hey, progress!
Installing the Raspberry Pi
Now comes the fun parts. Ideally you want to have only one cord coming out of the bottom of the case to supply power. There are ways to splice power from a cord with electronics and soldering and all kinds of stuff…but me, I’m simple. I just bought a 2-way power splitter:

Then all of the components fit nicely together with a bit of painters tape:
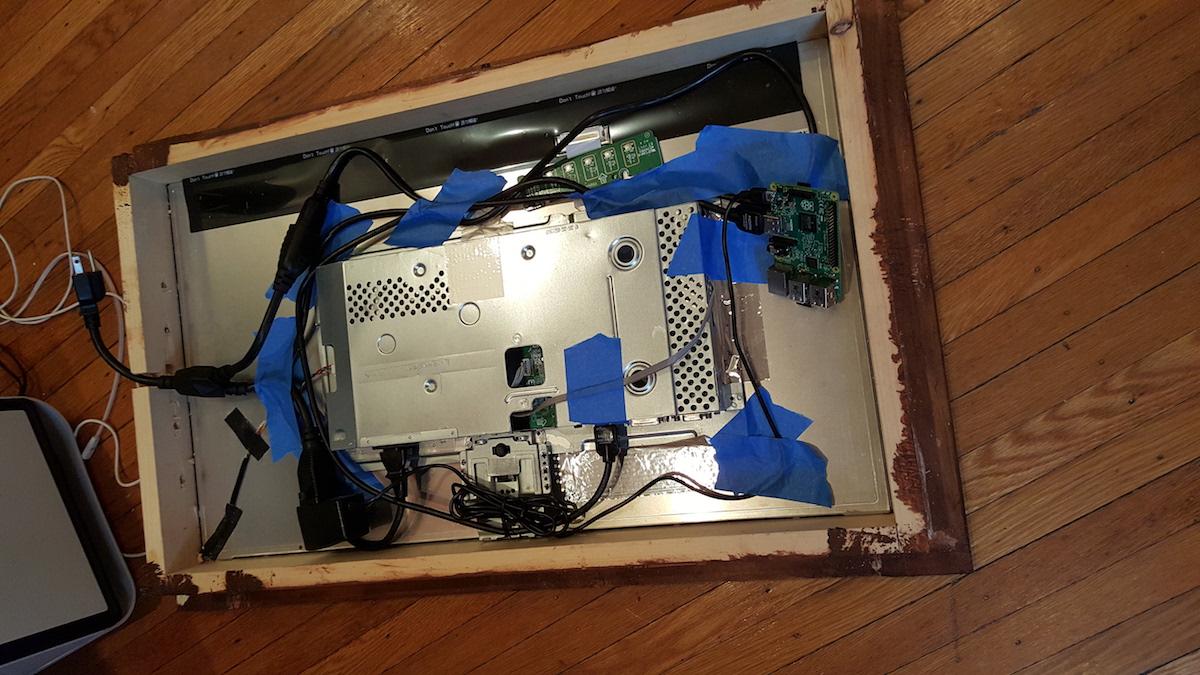
Now you can supply power to both the monitor and raspberry pi with one cable. Simply hook up the raspberry pi to the monitor, and ethernet to your router. I won’t go into super detail on how to install Raspian (the official linux distro of raspberry pi’s) because it would do this tutorial a disservice.
Once you go through the NOOBS installation process, you should finally be rewarded with the raspberry pi boot sequence:
Turning the Raspberry Pi into a “Kiosk”
Now it doesn’t make sense for the mirror to just show the raspberry pi desktop. There are a few different ways to get your raspberry pi to work like a “kiosk” but here are the steps I took.
Install Chromium
Depending on your raspbian version you may have some trouble with this. I know I did. The raspberry pi behind this mirror is running version Jessie of the Raspbian OS. Apparently there have been some changes to the raspbian repository, including the removal of Chromium which is the easiest browser to set up as a kiosk.
You can google around yourself but these commands worked for me to install it:
wget https://ftp.us.debian.org/debian/pool/main/libg/libgcrypt11/libgcrypt11_1.5.0-5+deb7u3_armhf.deb
wget https://launchpadlibrarian.net/218525709/chromium-browser_45.0.2454.85-0ubuntu0.14.04.1.1097_armhf.deb
wget https://launchpadlibrarian.net/218525711/chromium-codecs-ffmpeg-extra_45.0.2454.85-0ubuntu0.14.04.1.1097_armhf.deb
sudo dpkg -i libgcrypt11_1.5.0-5+deb7u3_armhf.deb
sudo dpkg -i chromium-codecs-ffmpeg-extra_45.0.2454.85-0ubuntu0.14.04.1.1097_armhf.deb
sudo dpkg -i chromium-browser_45.0.2454.85-0ubuntu0.14.04.1.1097_armhf.deb
Run Chromium on startup
Now that you have chromium installed, you can configure it to open on startup and in full screen mode:
Open the autostart settings:
sudo nano /etc/xdg/lxsession/LXDE-pi/autostart
Disable the screensaver by adding a # in front of the line:
@xscreensaver -no-splash
And add the following lines:
@xset s off
@xset -dpms
@xset s noblank
/usr/bin/chromium --noerrdialogs --kiosk --incognito "http://localhost"
Exit and save.
Now you’ve disabled the screensaver, disabled power management settings and have the chromium browser opening in kiosk mode on localhost on startup.
Using your Wifi network
There are a number of tutorials out there for getting your raspberry pi on wireless. If you’re already in terminal it’s as easy as editing your wpa_supplicant file:
sudo nano /etc/network/interfaces
And edit the network setting:
network={
    ssid="Network name here"
    psk="password"
}
I’m assuming you’re smart and not using the ancient and insecure WEP protocol on your router.
Now restart your wifi connection with these 2 commands:
ifdown wlan0
ifup wlan0
Don’t worry if you see an obscure error, I did too. You can experiment to make sure your change worked by using
ifconfig
If you’re wlan0 device has an assigned IP address you’re free to disconnect the ethernet connection and install your backboard. I just used some cheap breadboard like material held against the back of the monitor with 4 screws halfway in.
Setting up the webpage
Now we have a pretty functional kiosk. The missing piece is the actual webpage. I have written my own application for this, you’re free to modify it or use it.
I decided to use the PHP micro-framework Lumen with some jQuery and MomentJs.
Installing a web server
In order to host the webpage you’ll need to install a web server and to run Lumen you’ll need php installed:
sudo apt-get update
sudo apt-get install nginx php5-fpm php5-cli php5-mcrypt git
That might take awhile, but once that completes you need to configure nginx to know where the MirrorMirror site is located:
sudo nano /etc/nginx/sites-available/mirror.conf
And paste the configuration in this gist:
Save, and exit.
Now activate this configuration by running:
sudo ln -s /etc/nginx/sites-available/mirror.conf /etc/nginx/sites-enabled/mirror.conf
sudo service nginx reload
You now have a php enabled web server running on your pi!
Installing MirrorMirror
This is the final step of the project, installing the actual web page. Make a folder projects inside of /home/pi and move into it:
mkdir /home/pi/projects
cd /home/pi/projects
Clone the MirrorMirror web app with this command:
git clone https://github.com/ctrlaltdylan/MirrorMirror.git
Install Composer which will install Lumen’s dependencies:
curl -sS https://getcomposer.org/installer | sudo php -- --install-dir=/usr/local/bin --filename=composer
And use composer into install Lumen’s dependencies to get MirrorMirror up and running:
cd MirrorMirror
composer install
One last thing, nginx needs to be able to write/read files inside of the storage directory for the Lumen application to work.
sudo chmod -R 777 storage
Goto to http://localhost and you should see your version of Mirror Mirror up and running!
Current Features:
- Displays forecast and animated weather icon.
- Displays Date and Time.
- Displays a random greeting, currently there’s only one but planning on adding more.
There definitely needs to be more work to make this installation and customization process easier but I’m already thinking of ways to improve it. I hope you enjoy building/using your own magic mirror was much as I did mine!
Big thank you to Michael Teeuw for the original inspiration and documentation on the project.