Alright time for a little break from technobabble on this blog.
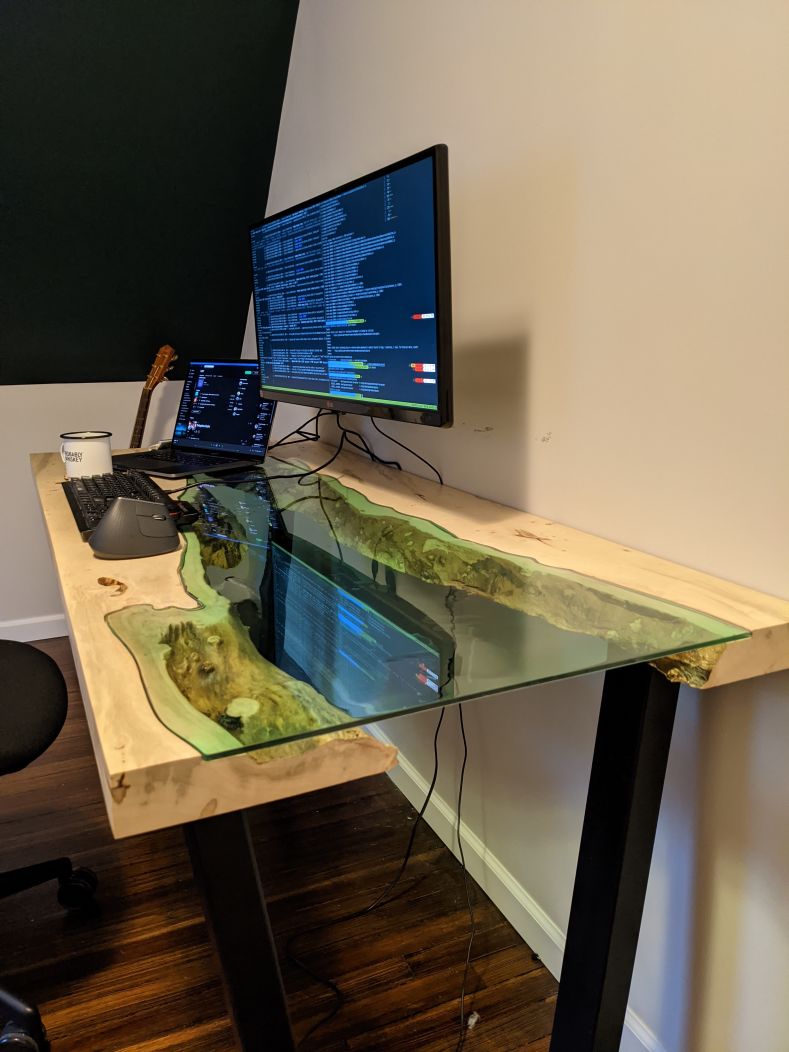
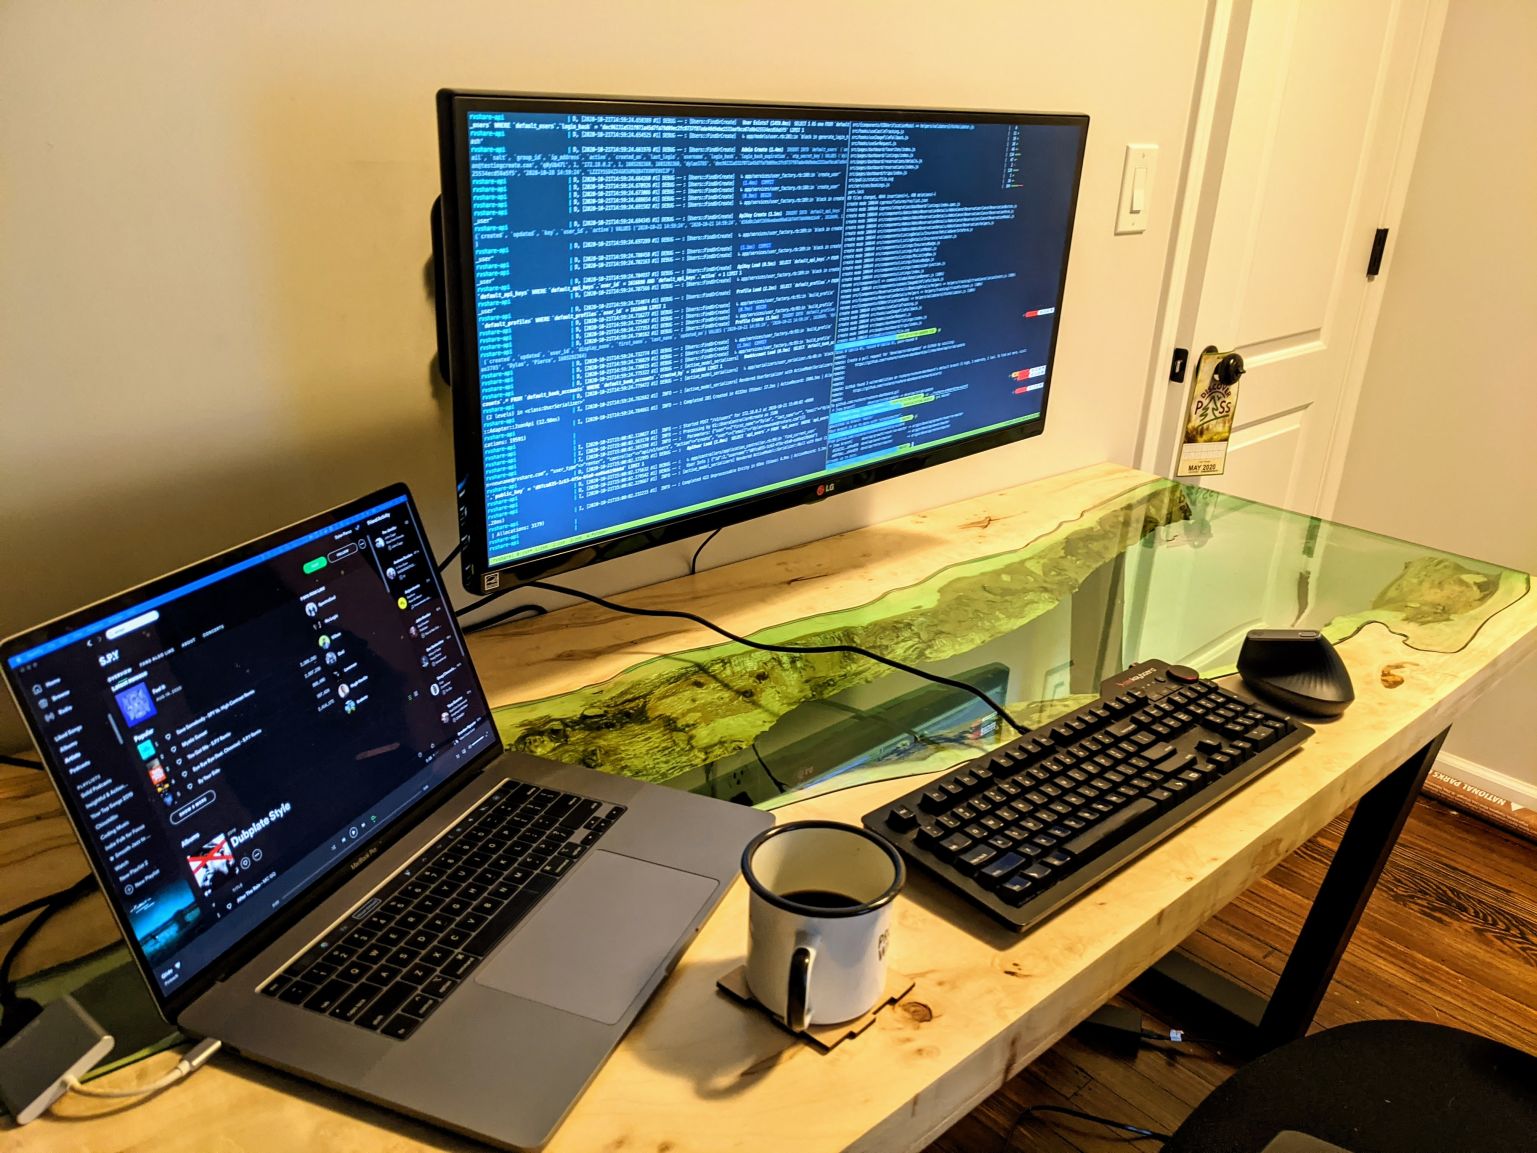
This is the story of how this desk I’m currently writing this post from came to be. By the end of it you’ll know the gist of how to make your own. And you’ll know exactly which pitfalls to avoid from my mistakes.
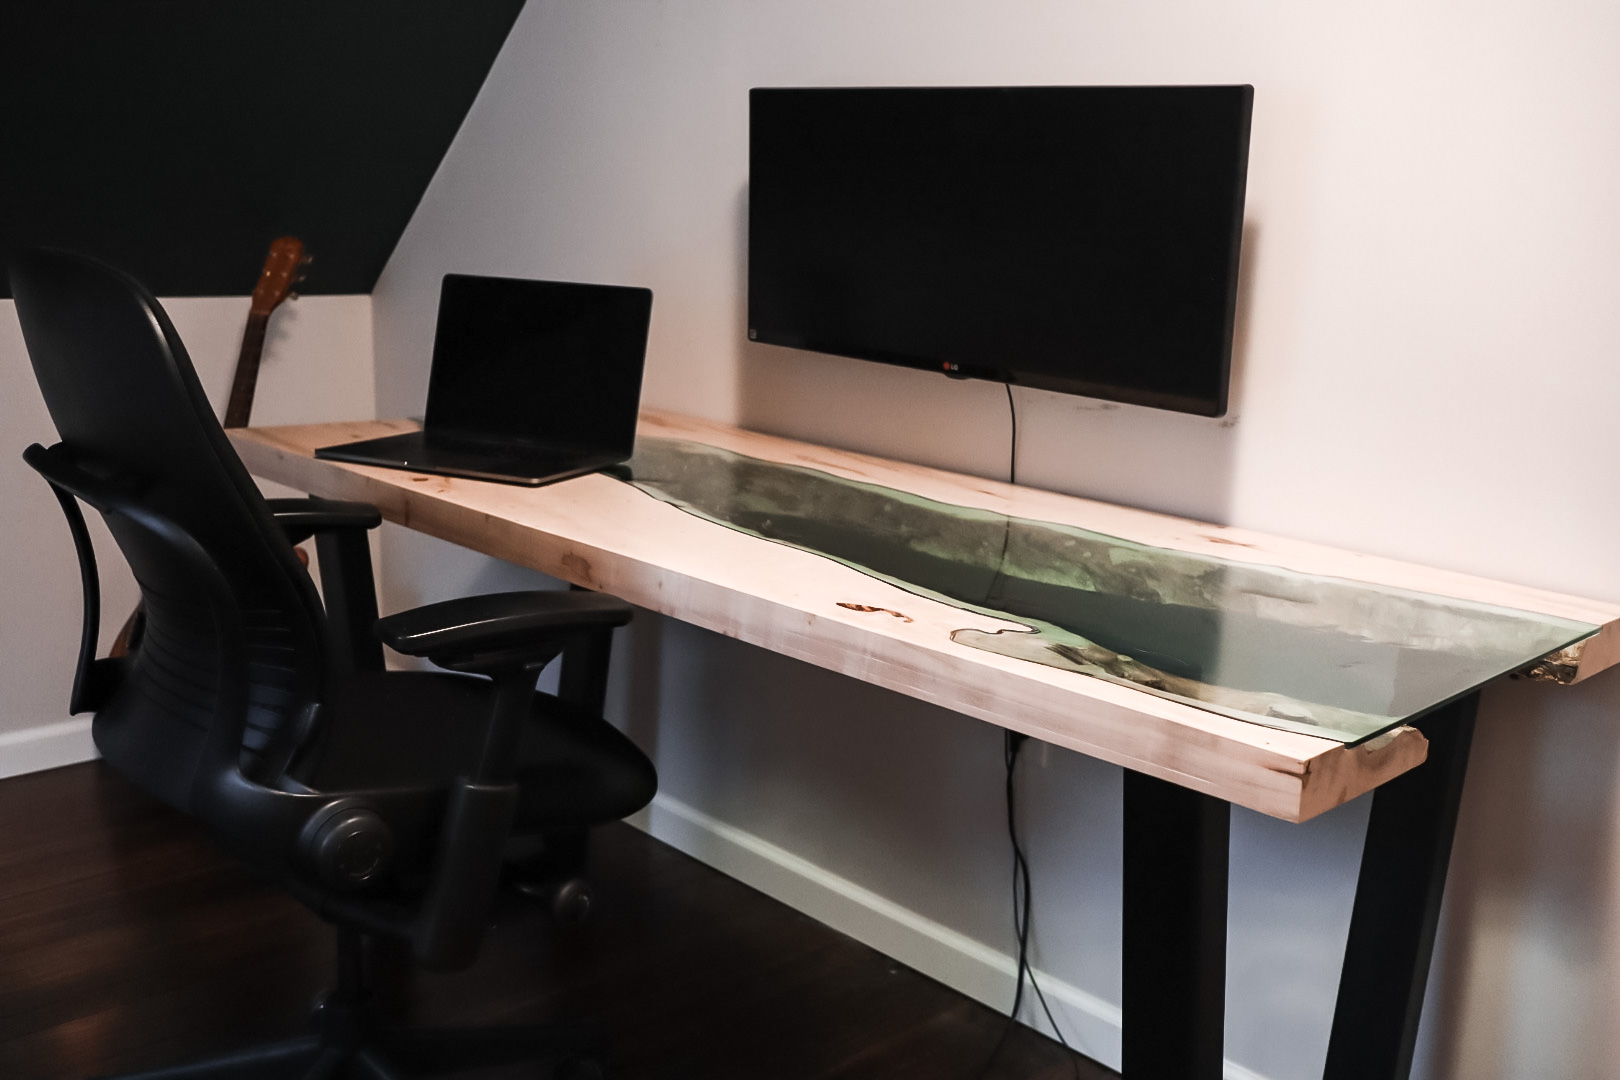
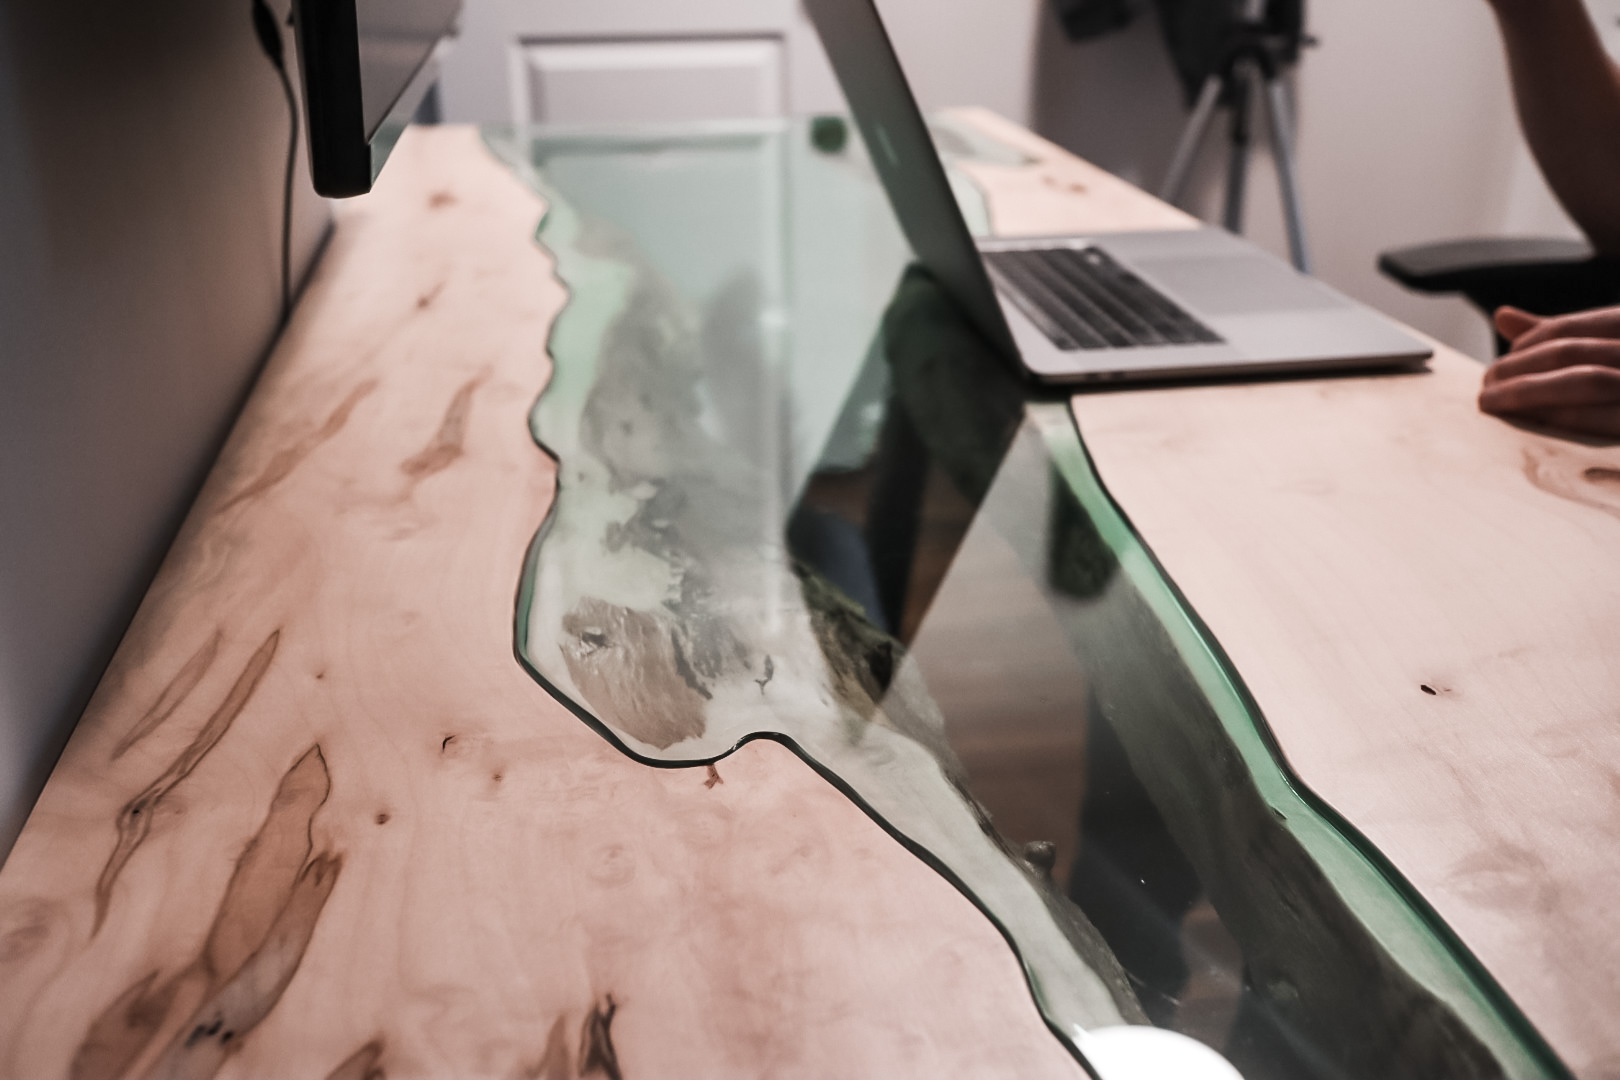
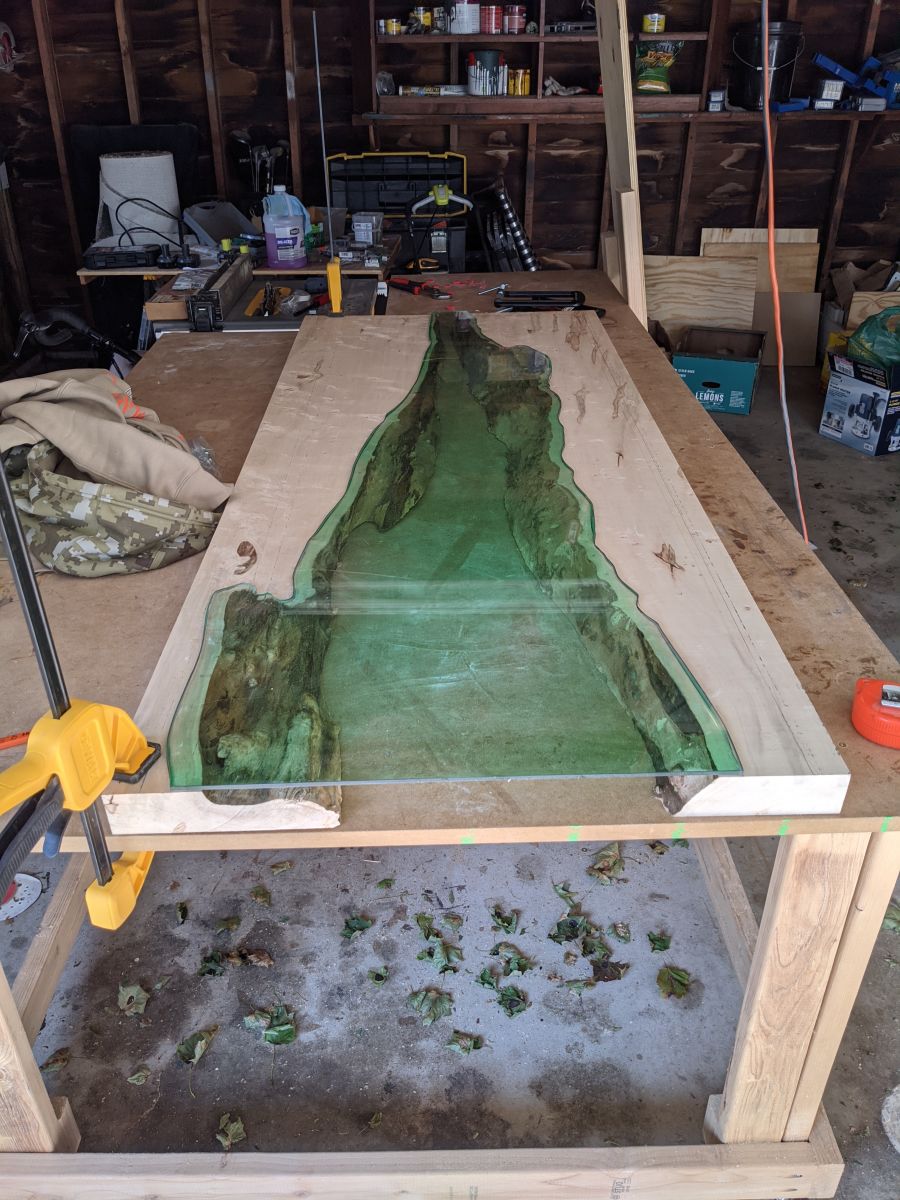
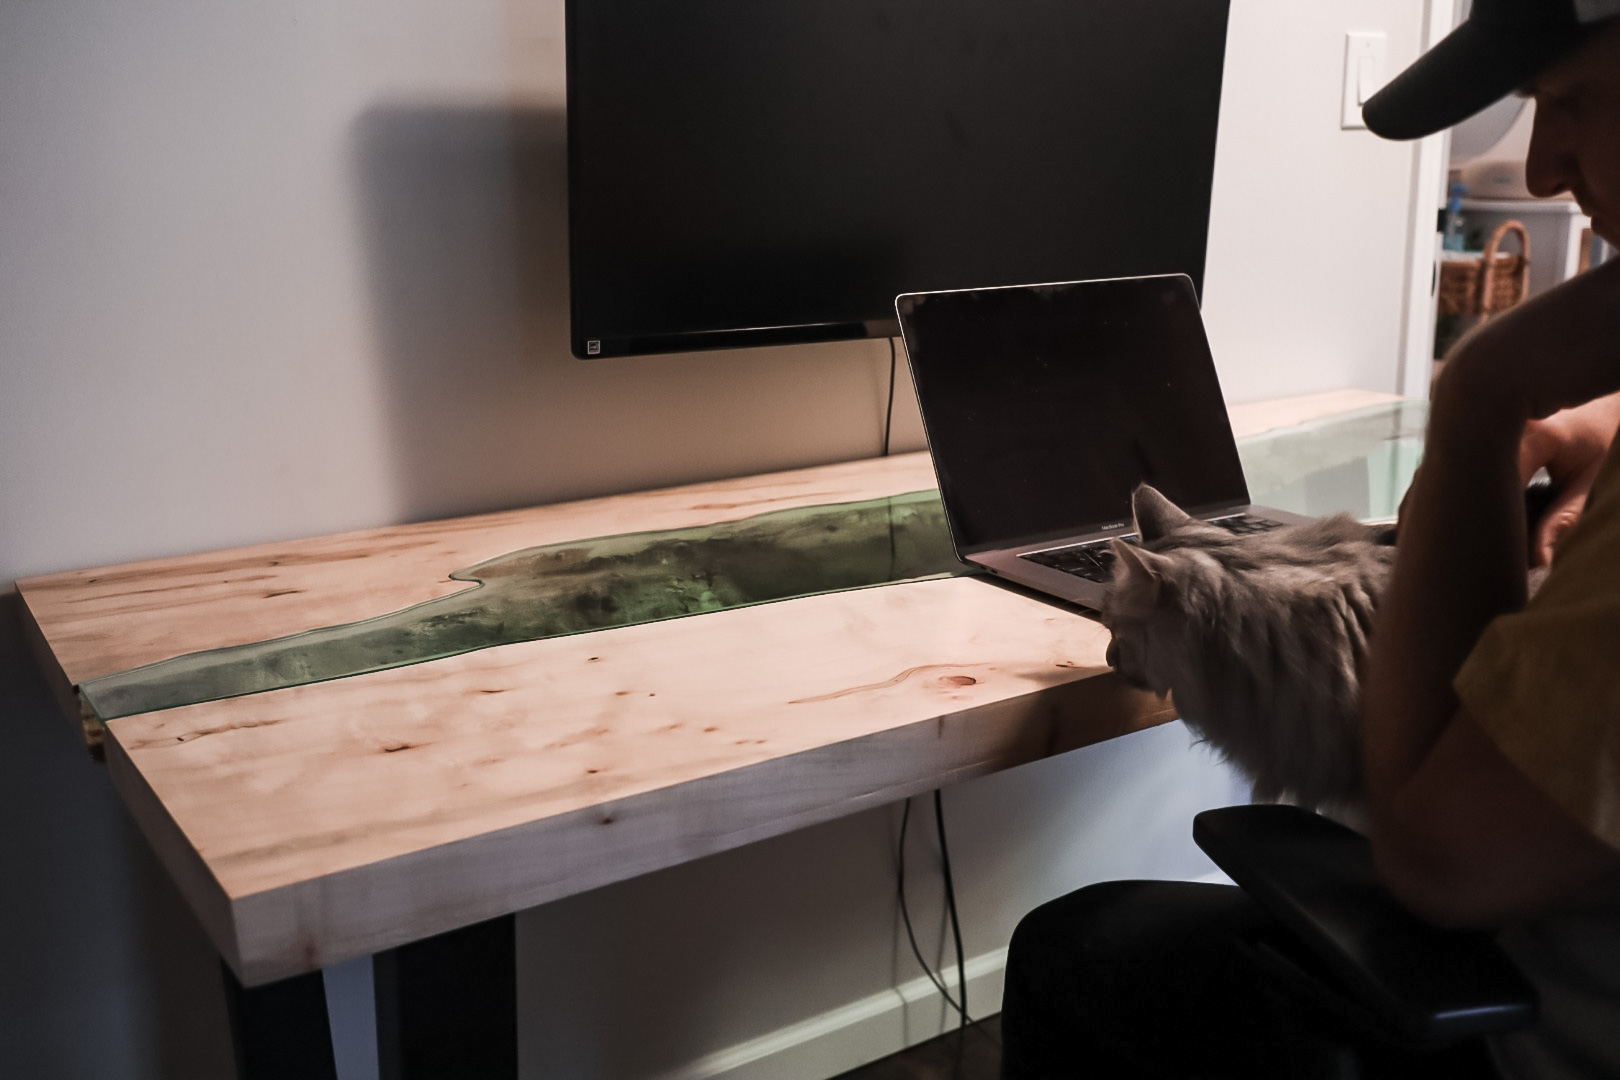
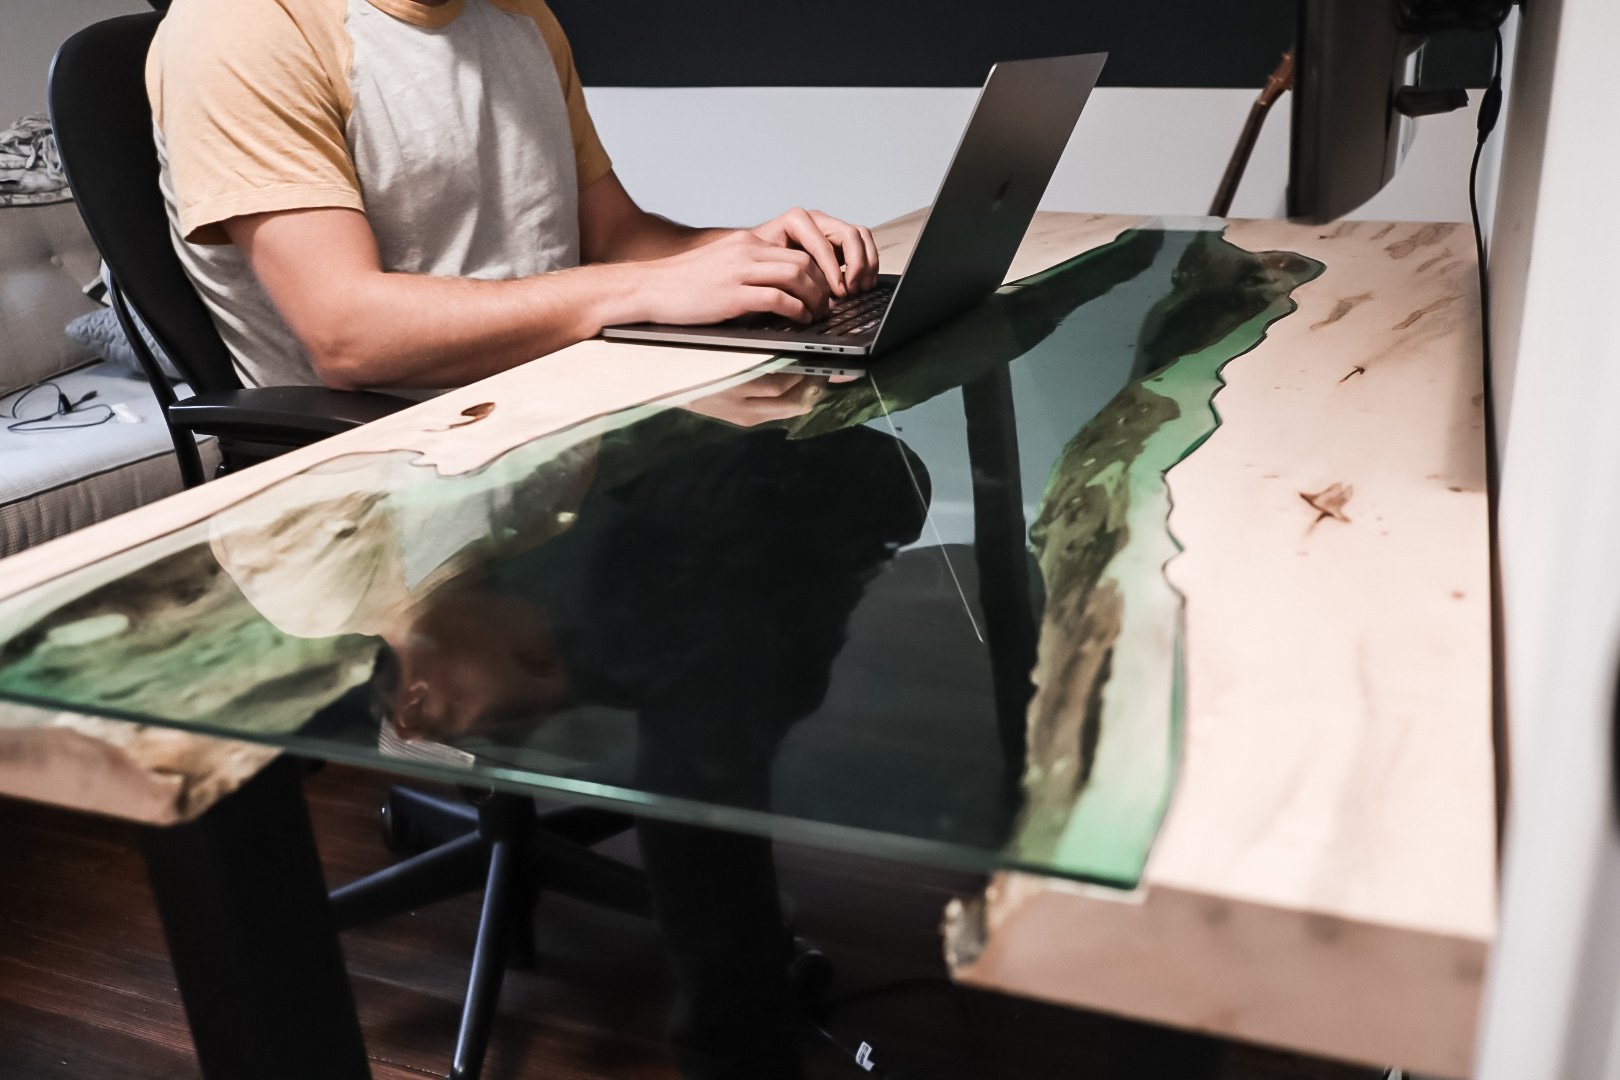
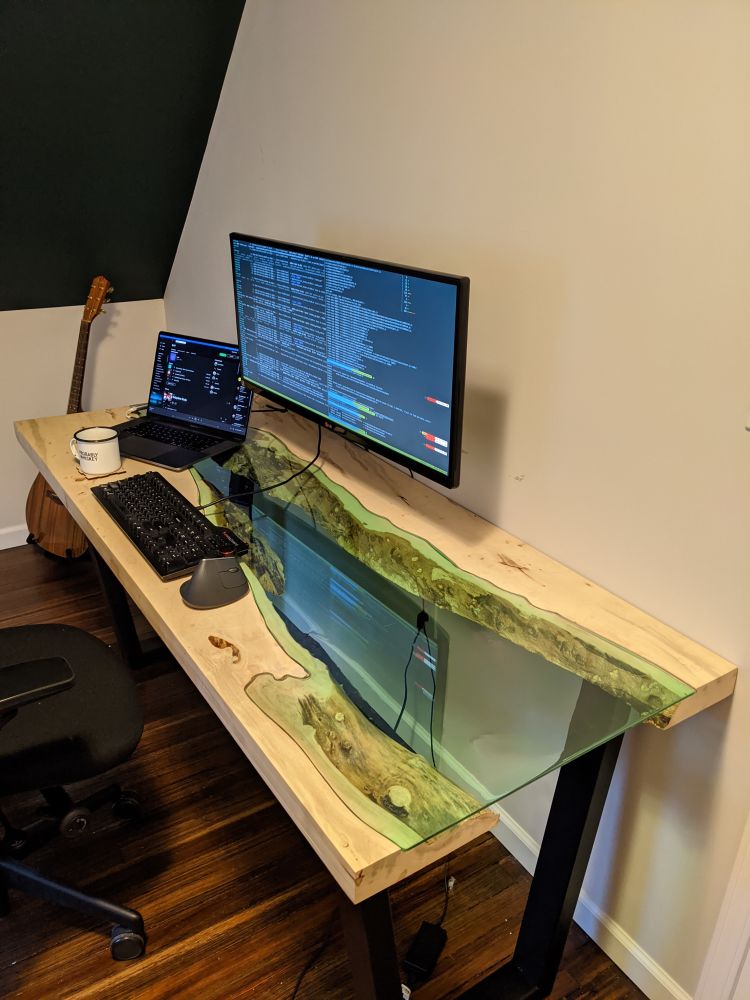
Yes those are live edge wood pieces facing inwards. No it’s not epoxy between them, it’s a real piece of glass formed to fix the natural flow between the live edges.
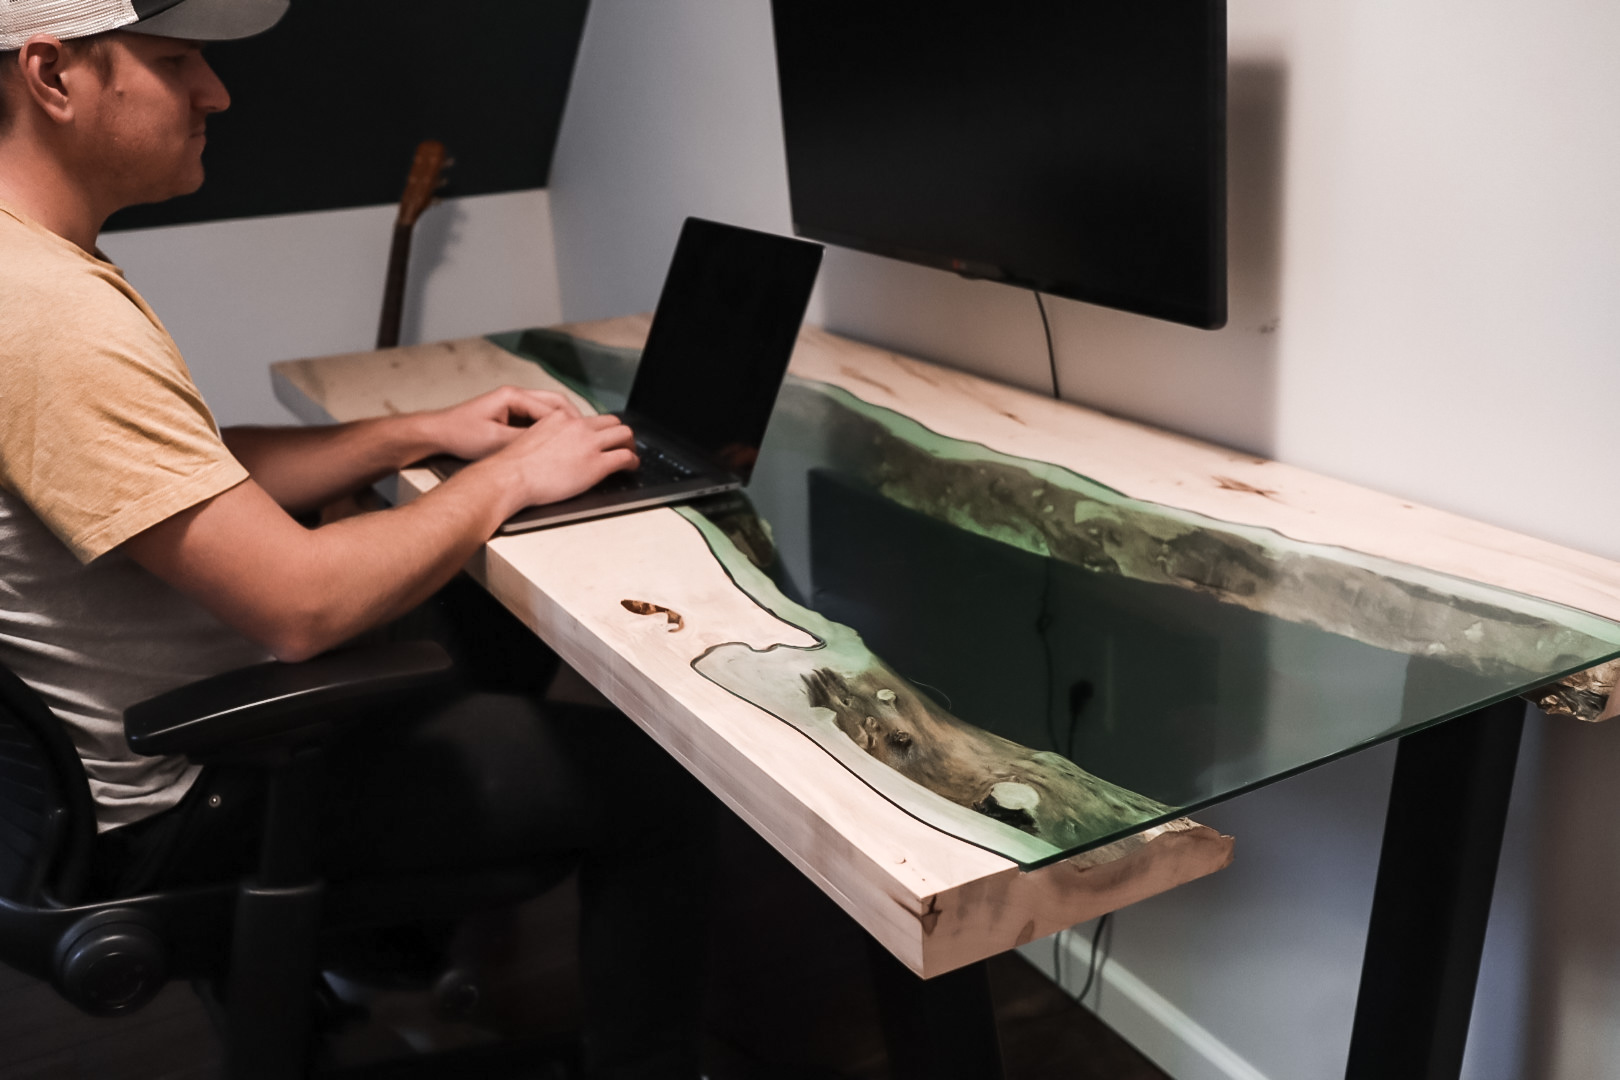
There’s zero glue or silicone holding the glass in place, just a 1/2” inset edge that allows the glass to fit flush against the wood. It’s just held in place by gravity.
How did I make it? I’ll do my best to tell.
The inspo
December 2019, Cleveland OH - my wife and I are at an Christmas Bazaar, and one of the last fronts we visit is this art gallery. Immediately I’m drawn to this coffee table that somehow looks like a levitating river.
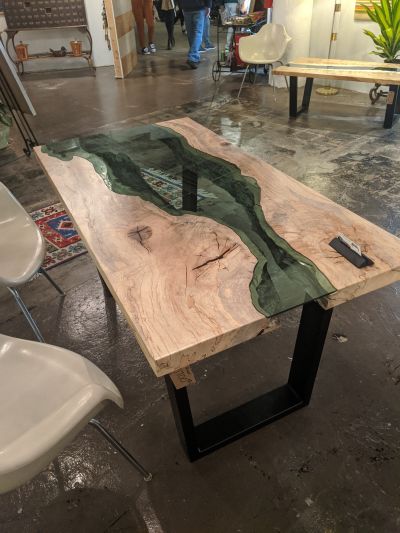
I’m struck. This thing is just goregous. It has live edge wood facing inwards with a flowing glass piece on top. It immediately reminds me the crystal clear pale plue rivers of the Pacific Northwest.
Then I’m in for my second shock - this 3ft x 5ft piece is listed at $5,700. Not only is it inspired by PNW nature, but real estate pricing as well.
Alright, fine. I’ll DIY it.
I am not a fine woods worker by any means. But I thought, I might be able to pull this thing off.
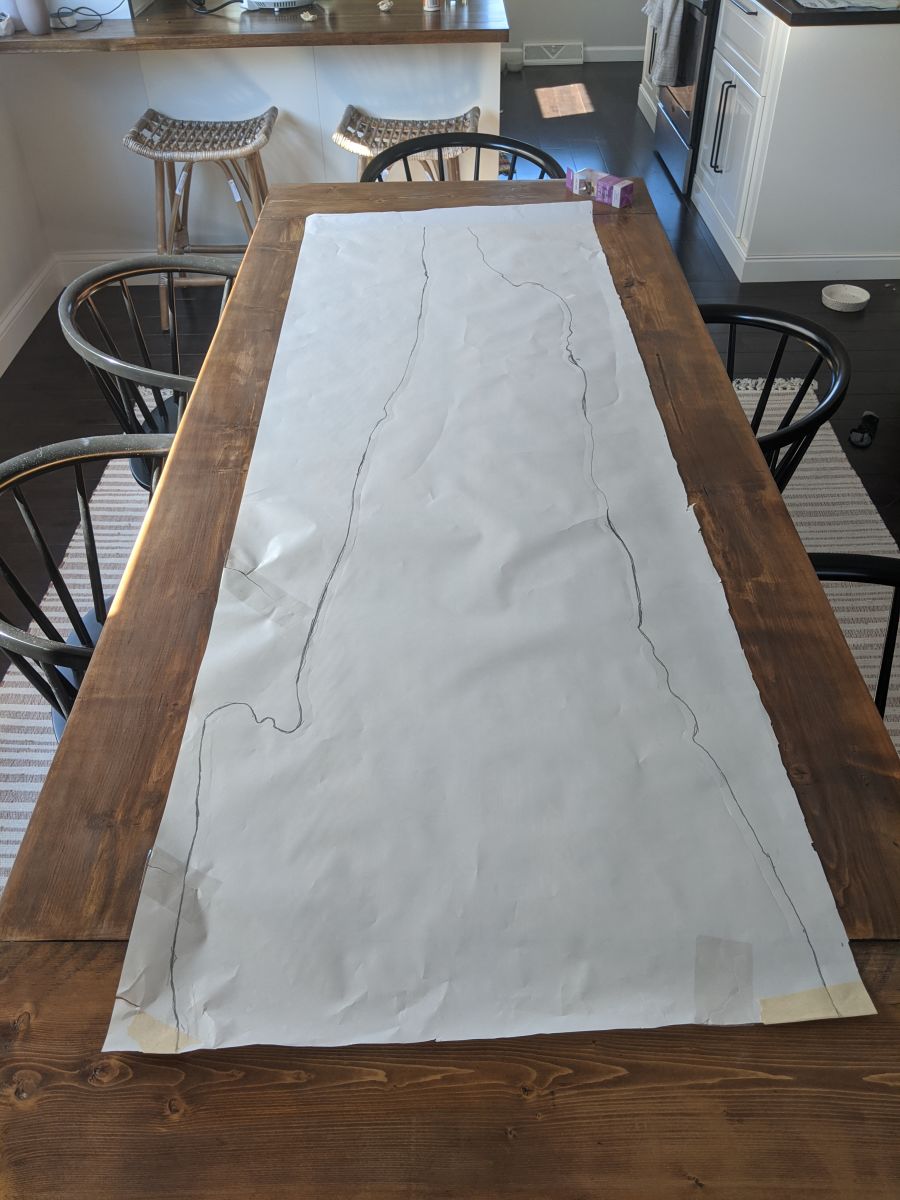
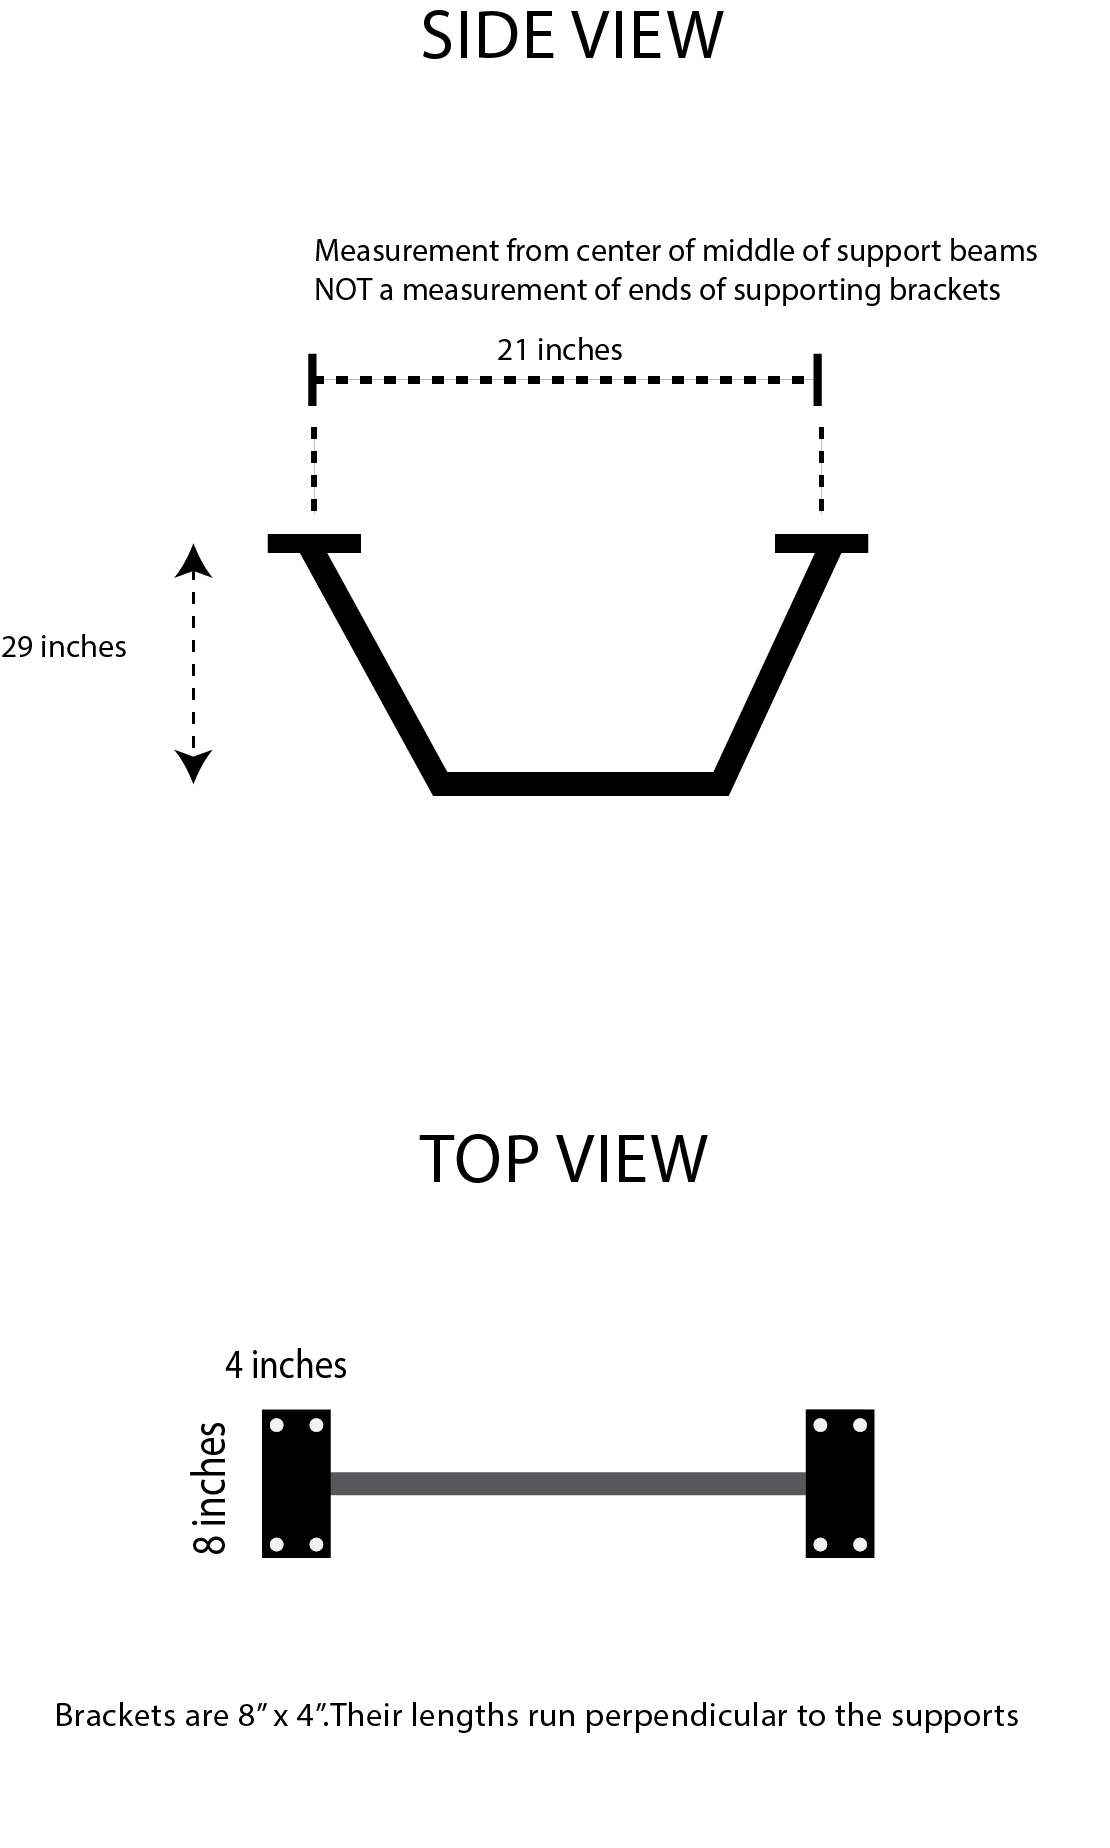
I designed a basic layout on paper and based it on my optimal ergonmic measurements:
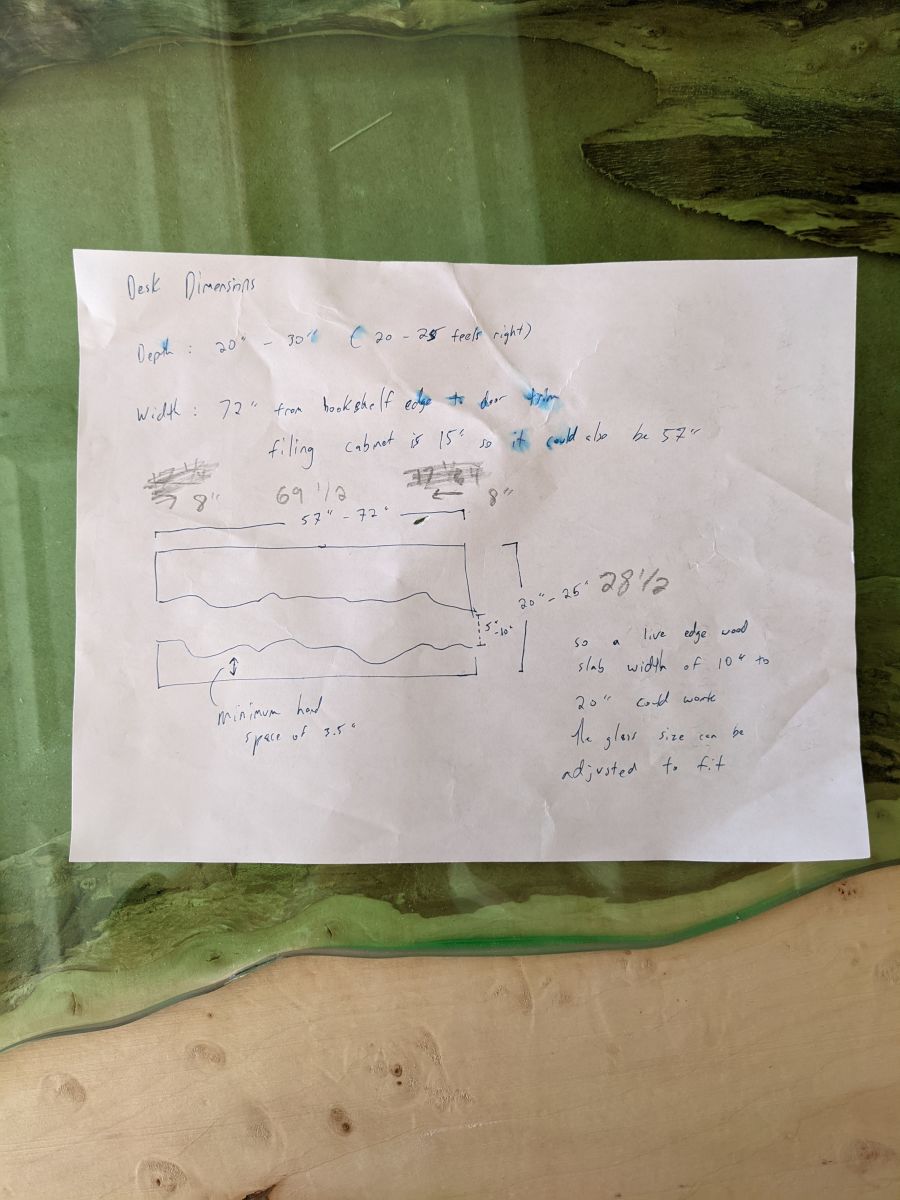
I’ve never even bought hardwood before, let alone custom glass. So learning the how part of the project was almost as hard as actually doing it.
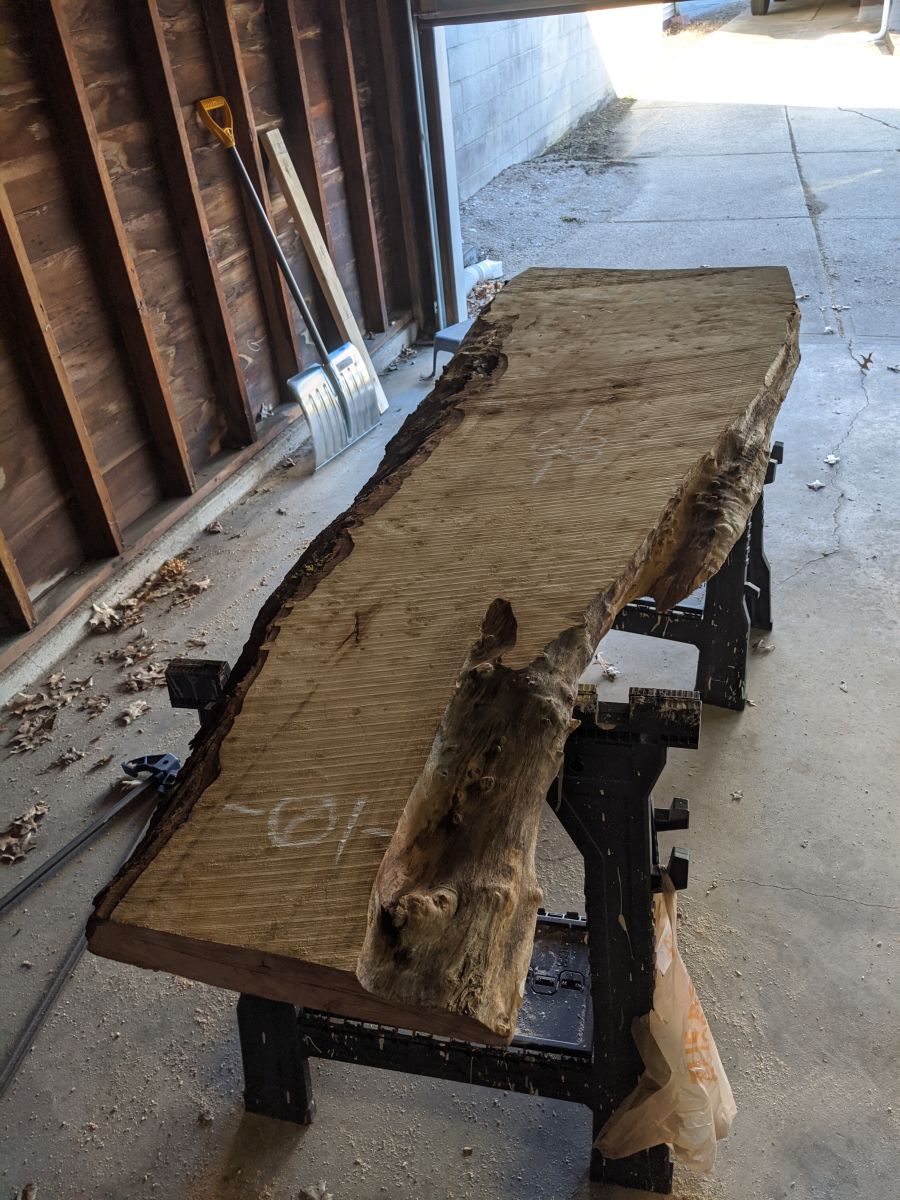
Finding live edge wood turned out to be the easiest part. Facebook Marketplace had a lot of listings and I was abled to find a kiln-dried white maple piece from a local seller. Thanks Charlie!
Getting it planed
This was just a raw piece of lumber. It was kelmed (dried out) but the top and bottom of the piece were not level at all.
Luckily there was a local mill/hardwood source that had a huge planer made by the owner himself. It was pretty amazing to see this thing just shave off a 1/8 inch of wood at a time. This thing was a beast.
Ultimately the wood was trimmed down from 2 1/2 inches to 2 inches.
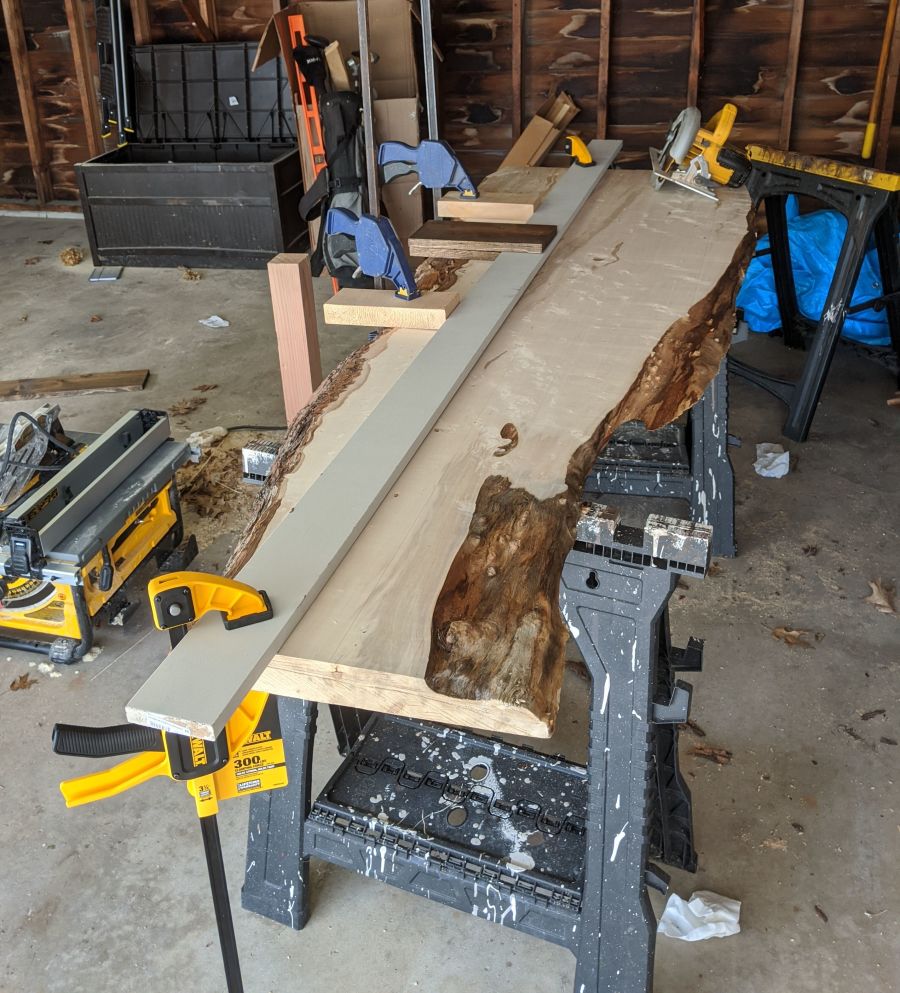
Finding the “middle”
In order to achieve the inwards river effect, the piece had to be cut in half.

Now, even though the top and bottom of the piece are level - the ends of the piece weren’t square. I thought way too much about that. My speed square in the picture above was pretty useless, but the pecan porter beer was not.
Ulimately, the cut you make down the middle of the piece ends up being your reference for a straight edge to make square from. So I decided to use a chalk line to mark a straight line and went with it.
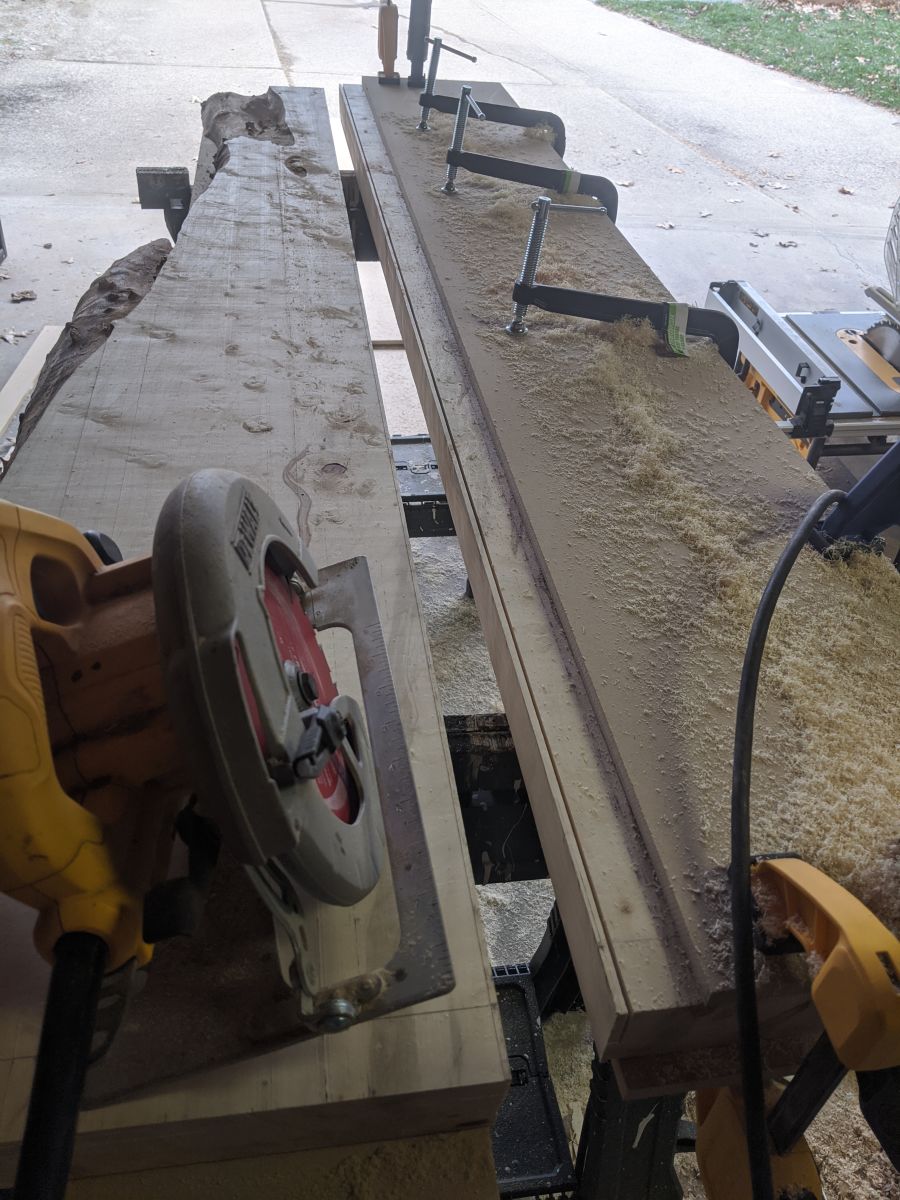
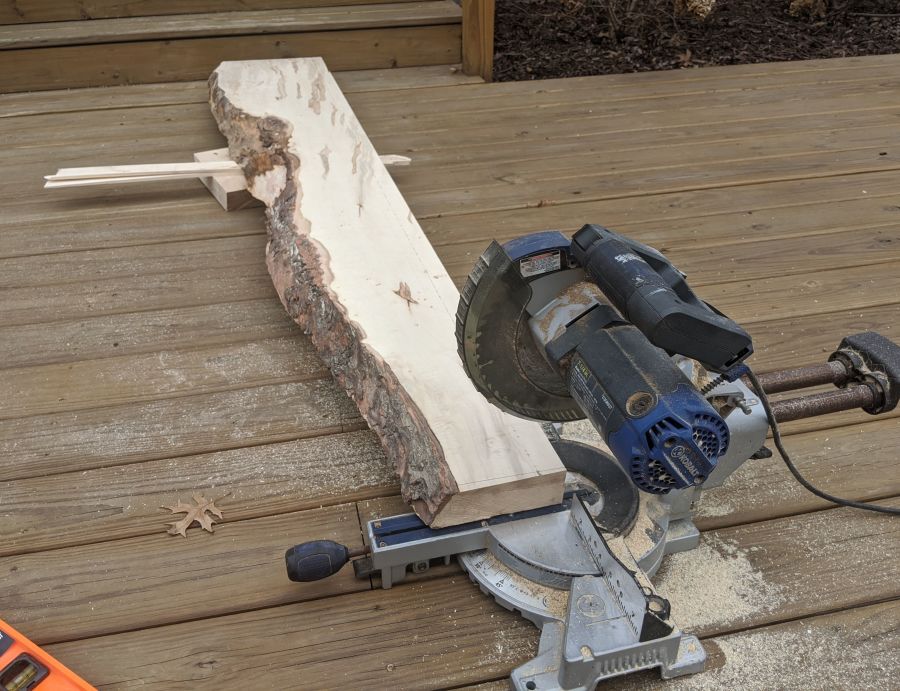
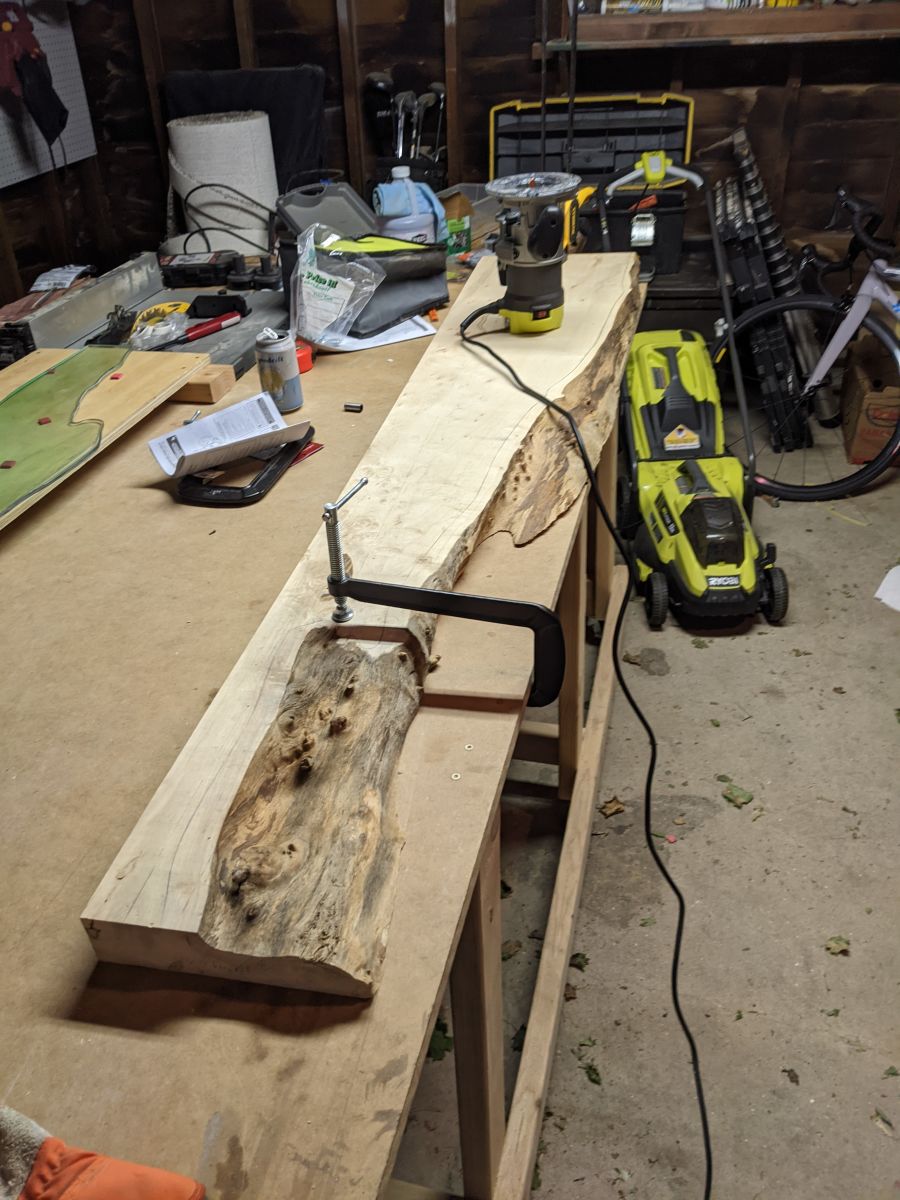
Cutting that jawn
Hardwood isn’t called hardwood for nothing. Unless you have some kind of super powered table saw I wouldn’t recommend trying that.
Also when it comes to live edge, you can’t use any kind of fence on a table saw to make a square cut anyway.
So my uncle gave me some solid advice on how to DIY your own fence to guide a circular saw. I bought a straight piece of azek board and overly clamped it.
First mistake I made was trying to make this cut in one go. My circular saw did not like that and neither did the wood. You could smell the burning wood immediately and the saw didn’t follow the guide.
In the end I did the following to get a nice cut:
- Replaced the azek guide with an MDF plywood piece
- Kept the circular saw’s depth shallow, cutting maybe a 1/4” at a time
- Repeat until cut through
The edges were much easier, I just marked square and mitered them. Take note of my very official miter saw table:
Now with the main cuts in place, I flipped the live edge inwards. And that was the last time I cut this piece of wood.
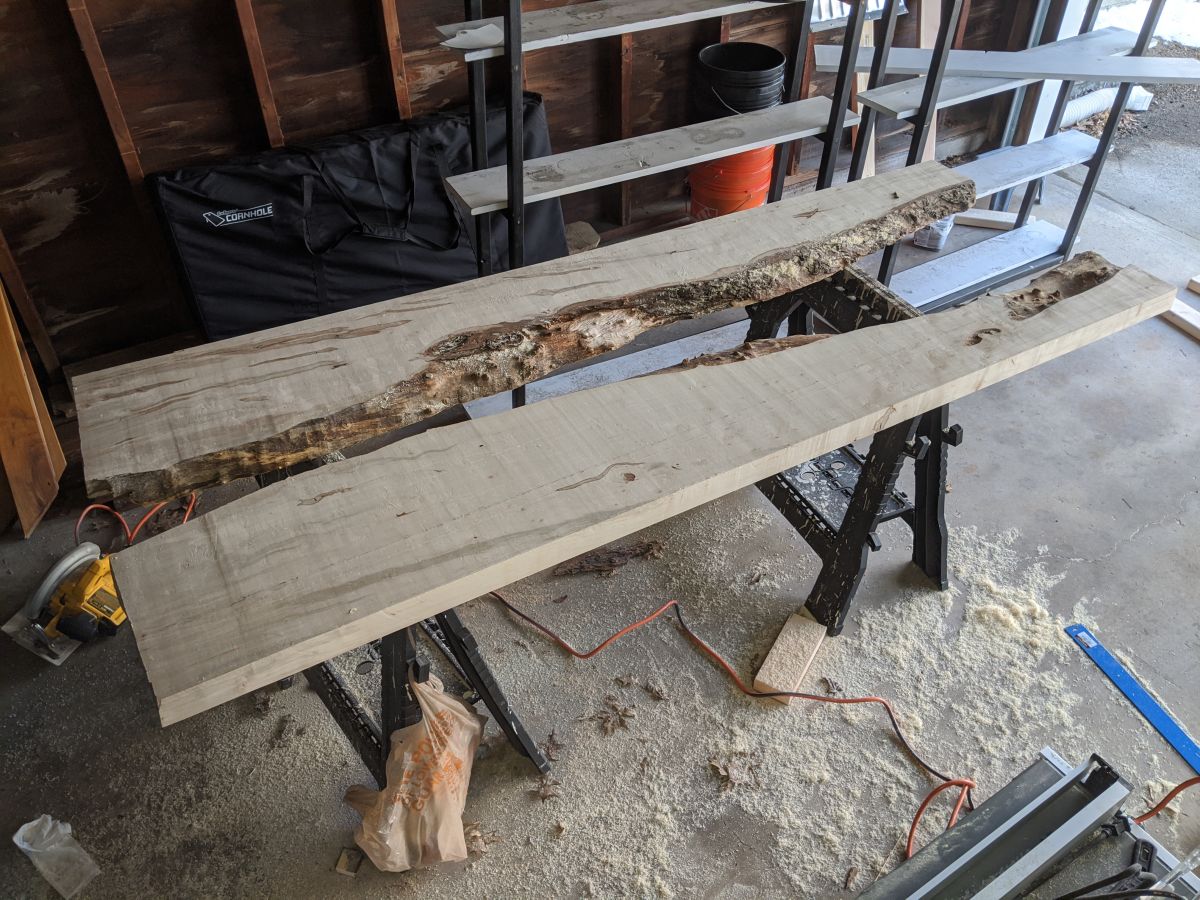
Another angle of the pieces flipped inwards:
Tracing the live edges
Now that the wood was cut I could focus on the glass piece that would fit on top.
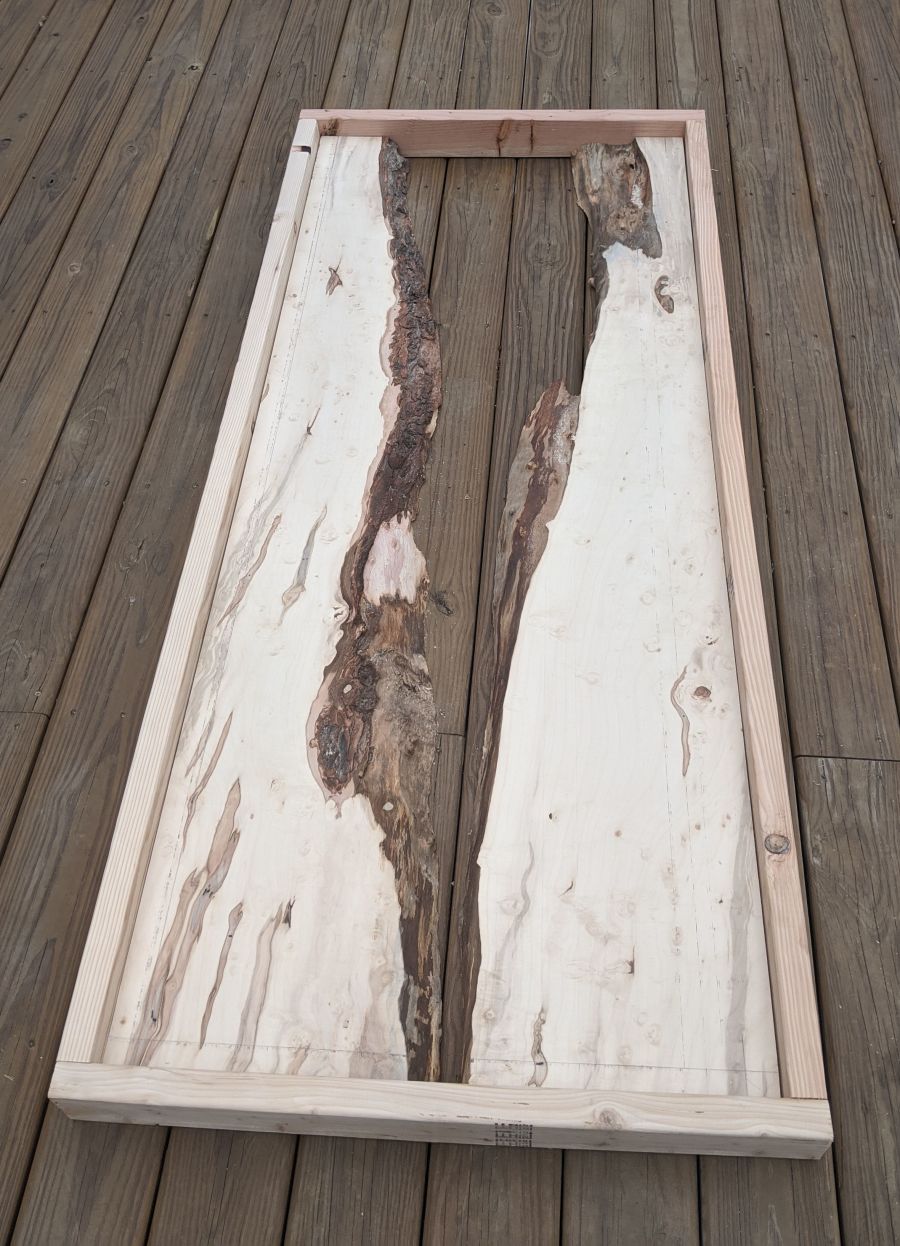
The whole trick to this river illusion is procuring a piece of glass that matches the flow of the live edges of the wood. So I set out to find a way to trace these edges on a big sheet of paper.
Once I had a tracing of the piece, I could go have it cut by a professional glass cutter.
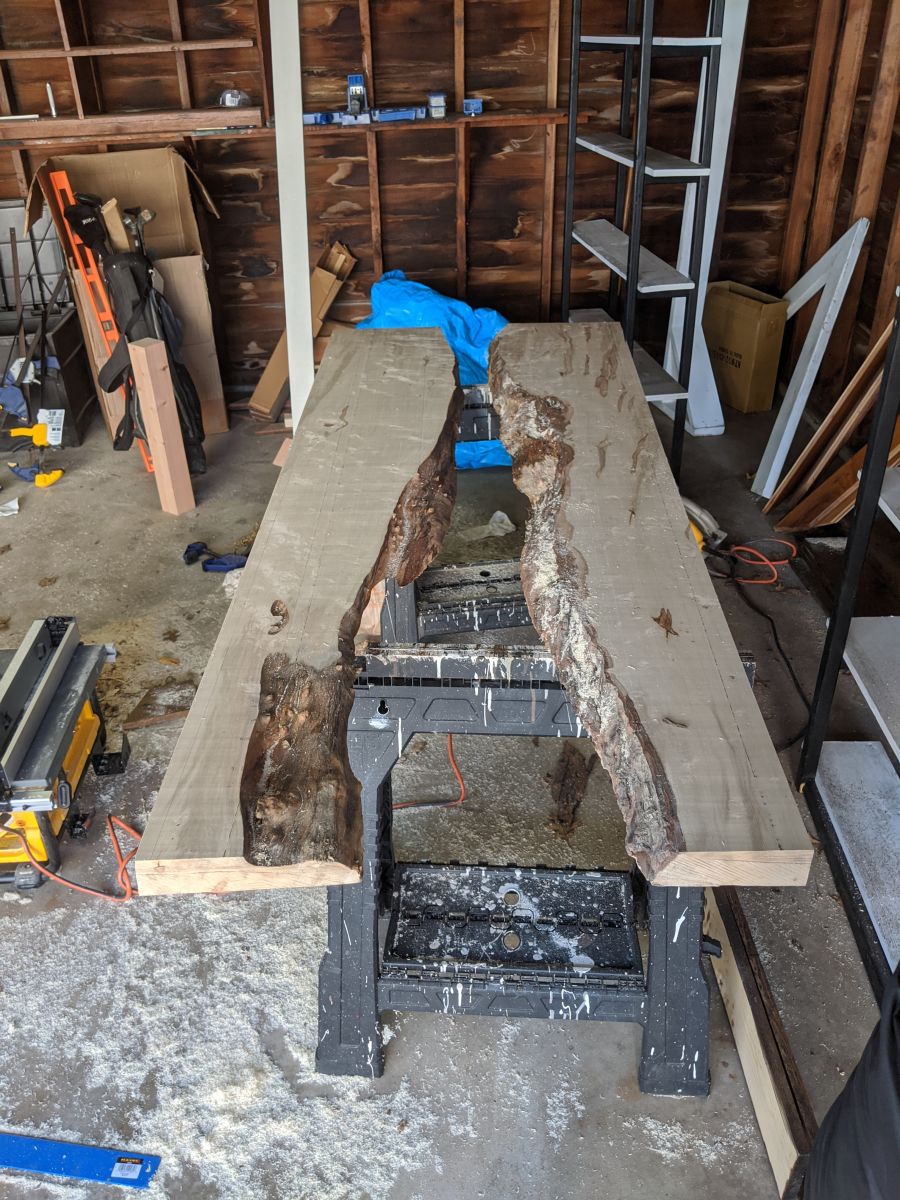
My main concern was that the pieces wouldn’t be square or would shift as I traced over top of them. So I built a frame that would fit the pieces exactly.
After fitting the pieces into the box snuggly. I placed semi-transparent paper over top to start the tracing of the live edges.
I traced a shape that was about 1/2” bigger than the gap between the pieces. This way there’s room for the glass to sit on top of the pieces.

Pro Tip: don’t do this outside if you can. Even the slightest wind moves the paper and it’s super frustrating.
Pro Tip #2: don’t worry about following the edge exact to the grain. Unless you’re using a wet jet CNC machine to get an exact cut, cutting the glass by hand won’t give you an exact match anyway. Big curves and good flow is much better.
But here’s the final product:
Getting the glass cut
Now I thought this would be super difficult, but after just a few calls I was able to find a local company that specializes in making custom glass pieces.
I brought my tracing paper to Superior Glass in Avon, OH and a few weeks later it was good to go. Not much else to share here!
The picture above is from before it was painted green. I would recommend spending the extra on an actual green or blue glass instead of dyeing it.
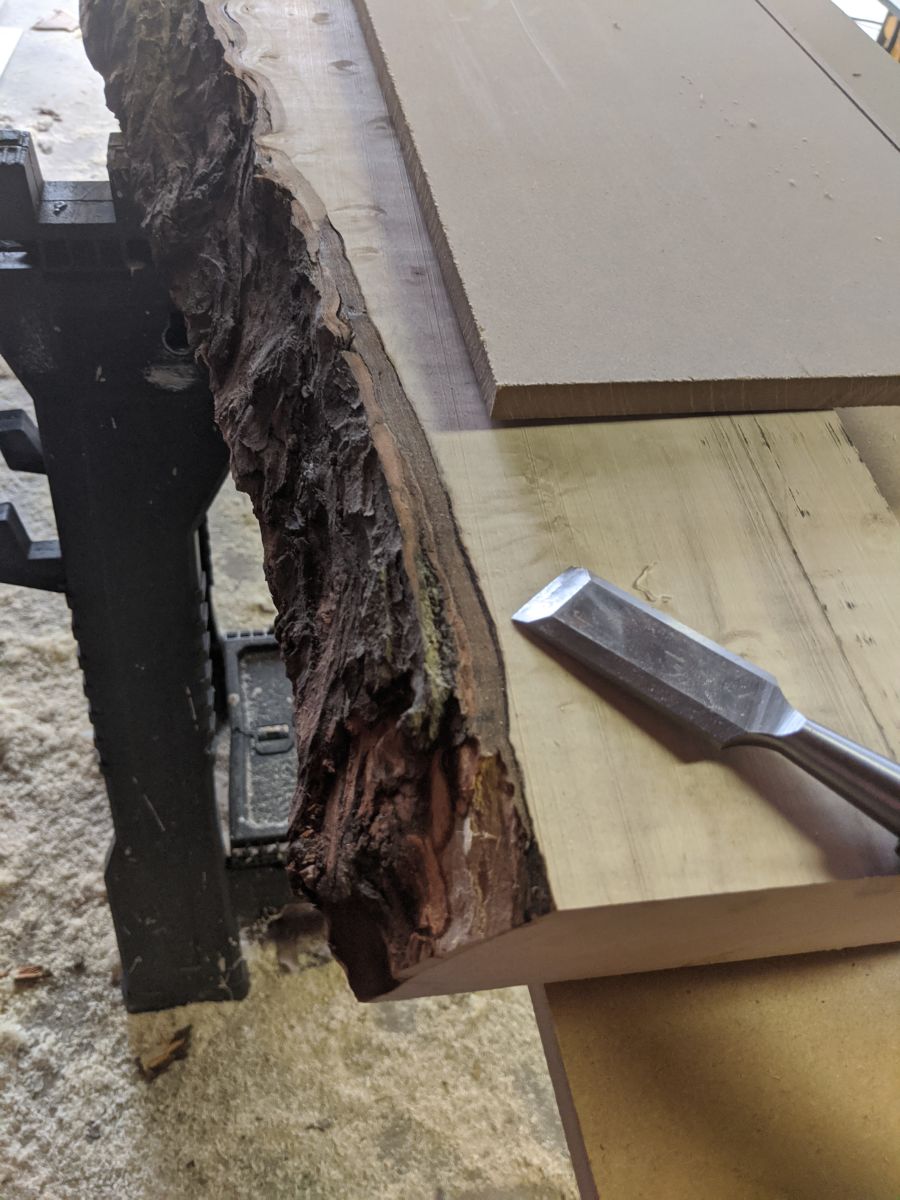
Removing the bark. Wish I didn’t have to
Unfortunately, you need to remove the bark on live edge pieces. So I hand chiseled off the beautiful bark from these pieces.
To hold the wood in place I clamped the same MDF guide from the cutting step against the back of the wood. This way I wouldn’t damage the wood and it wouldn’t move as I chiseled off the bark.
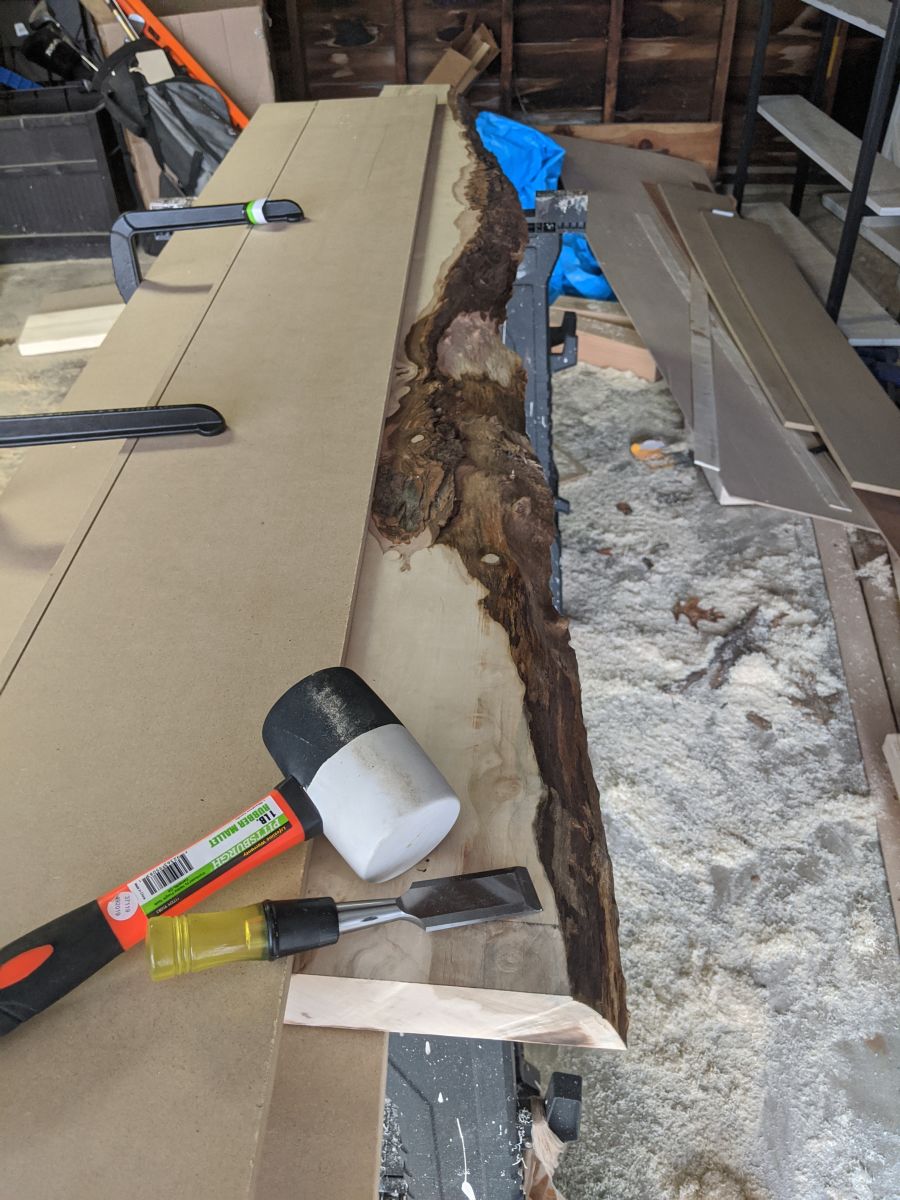
As much as I thought I would hate the non-bark look, it actually still has a lot of character and I’ve grown to like it. However, if you know of a way to keep bark on live edge pieces, please tell me your secret. I would love to keep it the same.
Shaping the “river”
The glass was ready to pick up from the shop about a month later. We took a nice, slow, careful, cautious, drive home from that shop.
Now that the glass was actually in my shop, I could start to form the woods live edge to match the glass.
I positioned the 2 live edge pieces and custom glass in the form I wanted. Then I outlined the glass with a pencil to make a realistic tracing line for the router.
The mark to the left of the live edge was my tracing:
Each side took about 2 hours of routing. I may have taken longer but I was very paranoid of cutting too far in or making holes.
When I hand routed the edge. Never routed before, but it wasn’t as difficult as I thought it would be.
A couple of tips:
- Make long shallow cuts, short cuts cause burns
- Don’t ever change the depth of the bit of the router, that’ll screw up the flushness of the glass
- The live edge itself is softer than it looks
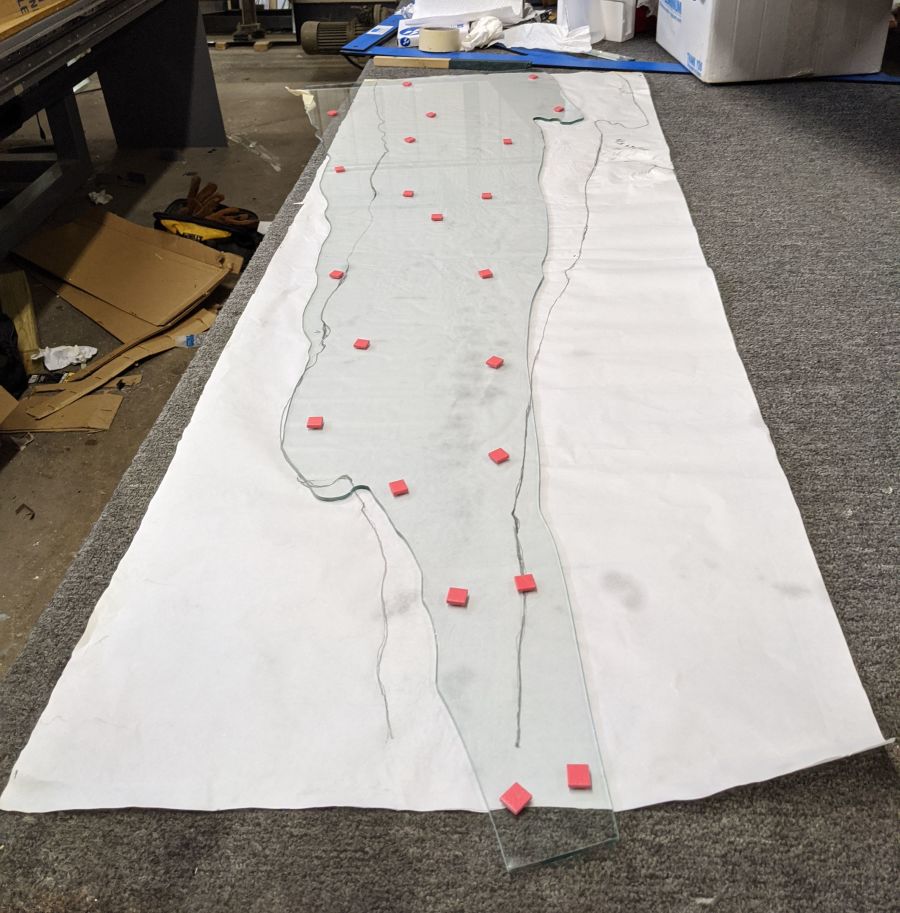
This was the moment of truth when I brought the 2 live edges together to form the river. To my surprise, it wasn’t half bad!
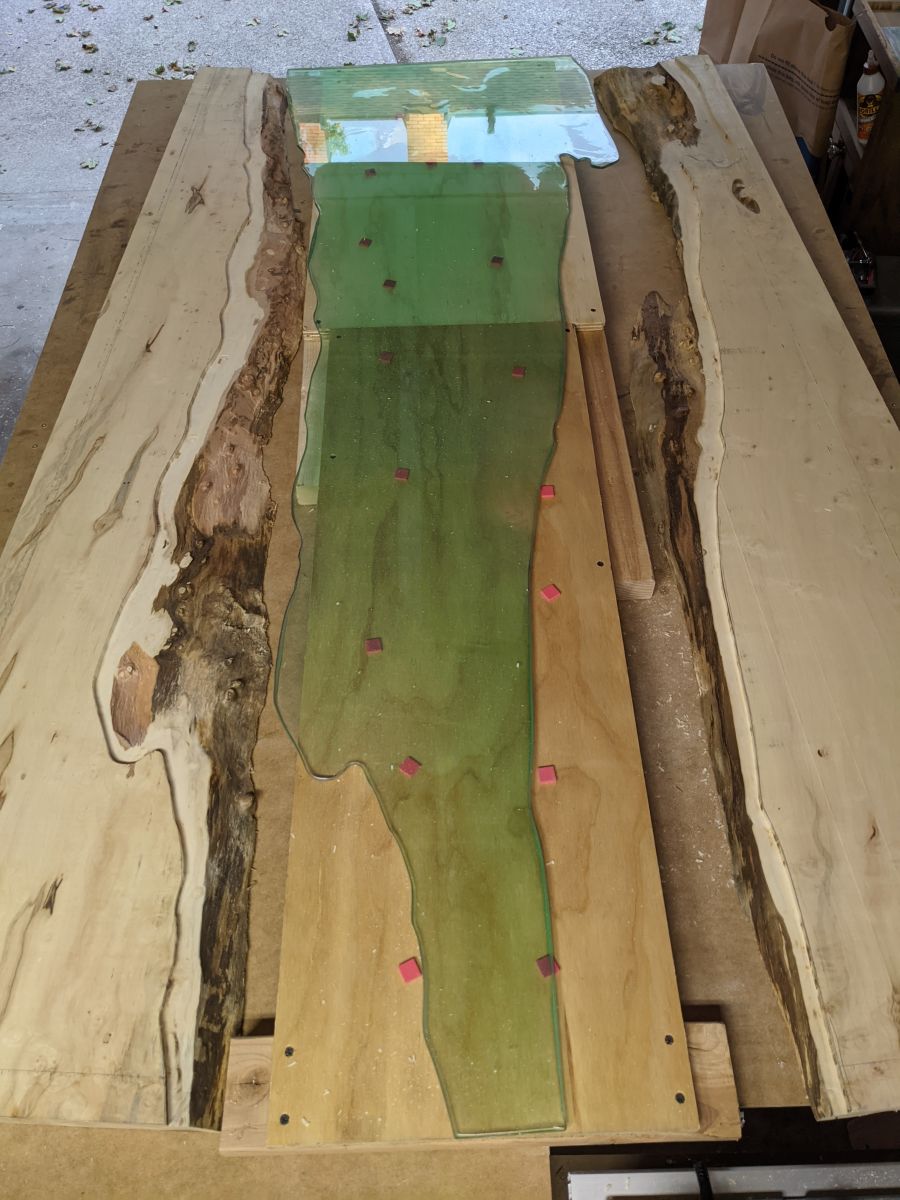
This was a pretty fun moment, you could actually start to visualize the desk coming together. Note: the red squares are just little spacers that were to protect the glass from the hard table:
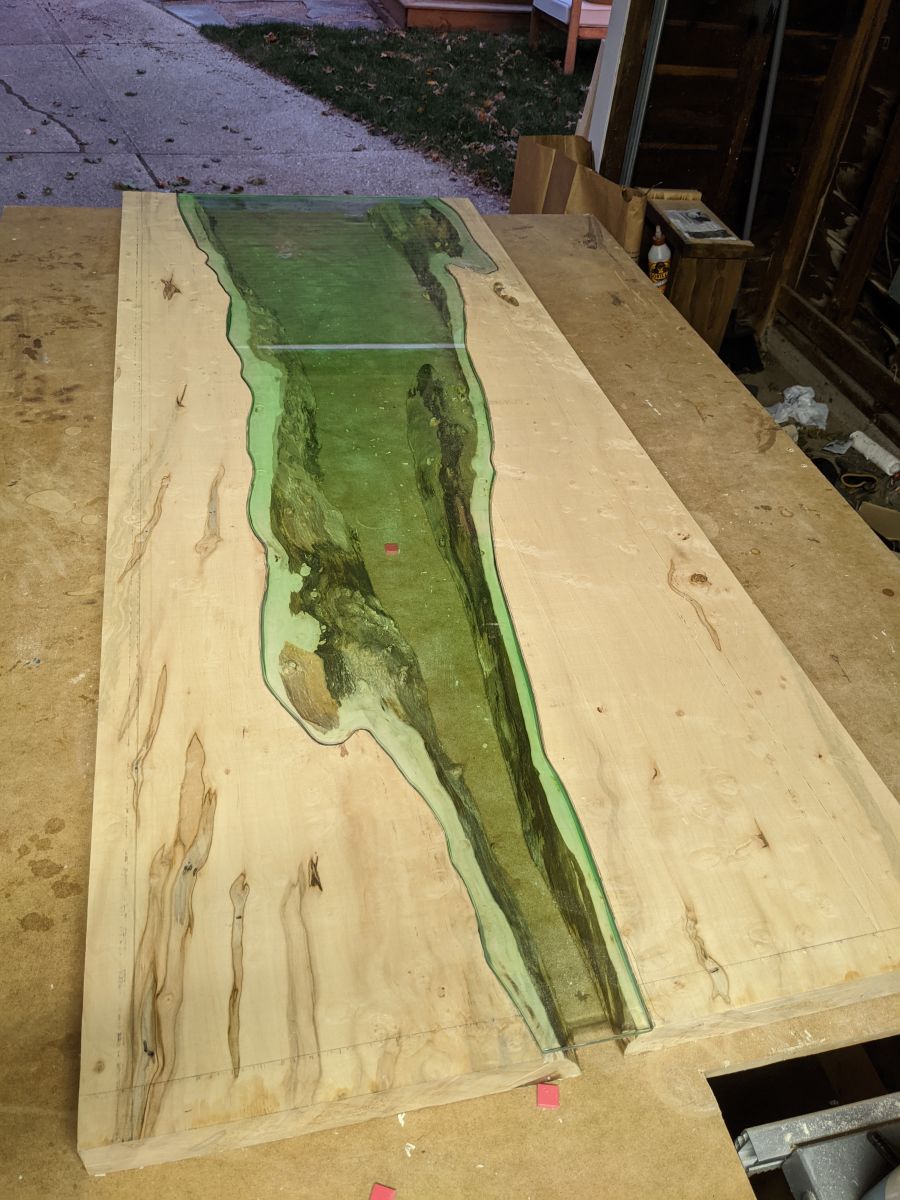
Finishing the live edge wood
Now it was rough cut to size, the “river” was in place. Not it came to sanding and sealing the actual wood.
I did 3 passes of sanding: 80 grit, 120 grit and finally 220 grit. I used sanding sponges to hand sand the river cut shelf itself. The rest of a combination of a belt sander and mouse sander.
After sanding I used a matte water based poly to seal the wood itself. I applied with a nice paint brush and waited at least 12 hours between coats. In total I did 4 coats on the entire surface of the wood, including the live edge itself.
Really happy with the way it turned out. The poly added a really nice sheen to the wood and preserved its natural color. I didn’t want to stain this piece at all. I was really trying to capture the raw look of the wood.
Designing the legs
At this point, the dimensions of the table are set. The glass and wood are finished and you know the final exact width & length of the piece.
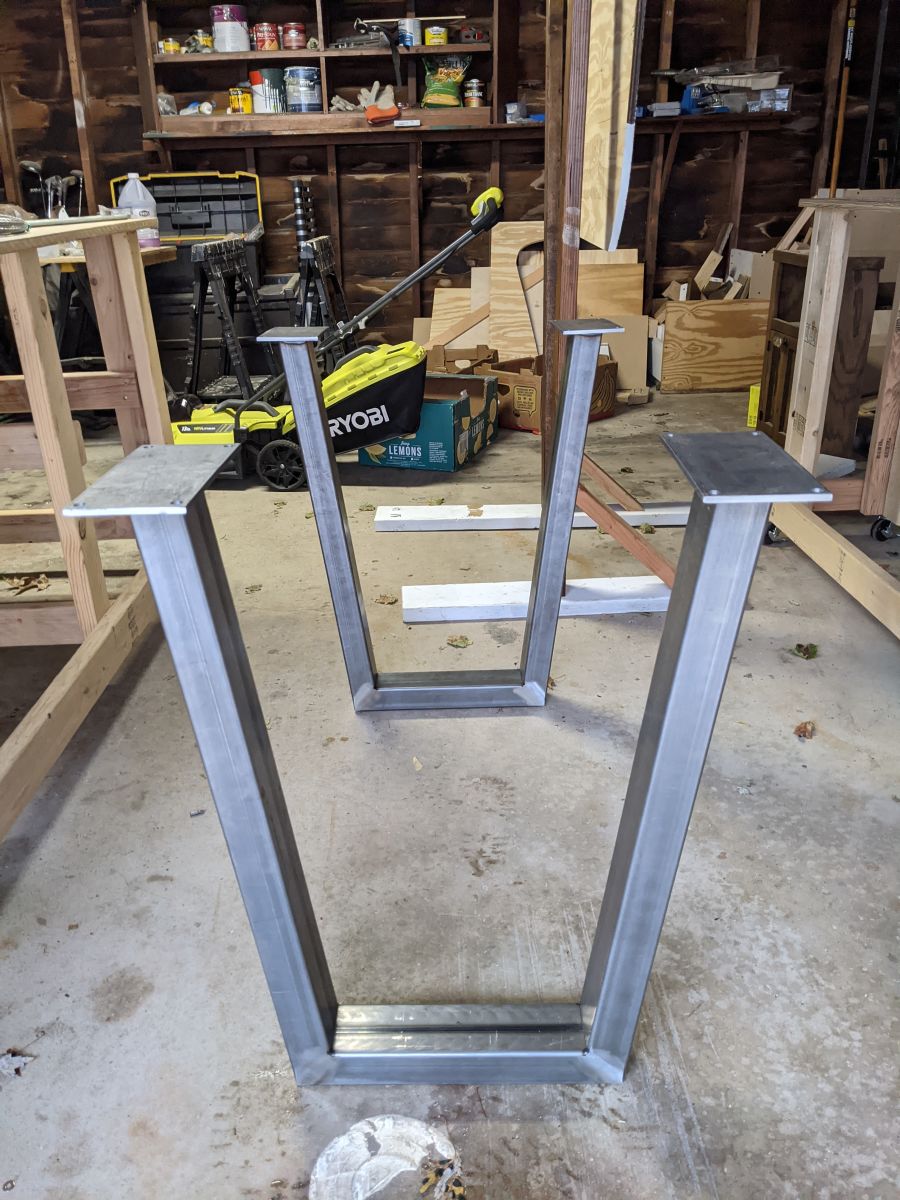
I took measurements and designed the table legs. I made a super professional diagram in Adobe Illustrator and shopped around Etsy with it. I wanted table legs with U shape to completion the illusion that the table was floating.
But I will not be sharing their shop name because I’m disappointed with the finished product and their service and I honestly wouldn’t recommend them to anyone else.
But I definitely recommending drawing up a basic diagram like mine before you contact sellers, it’s so much easier to communicate with them.
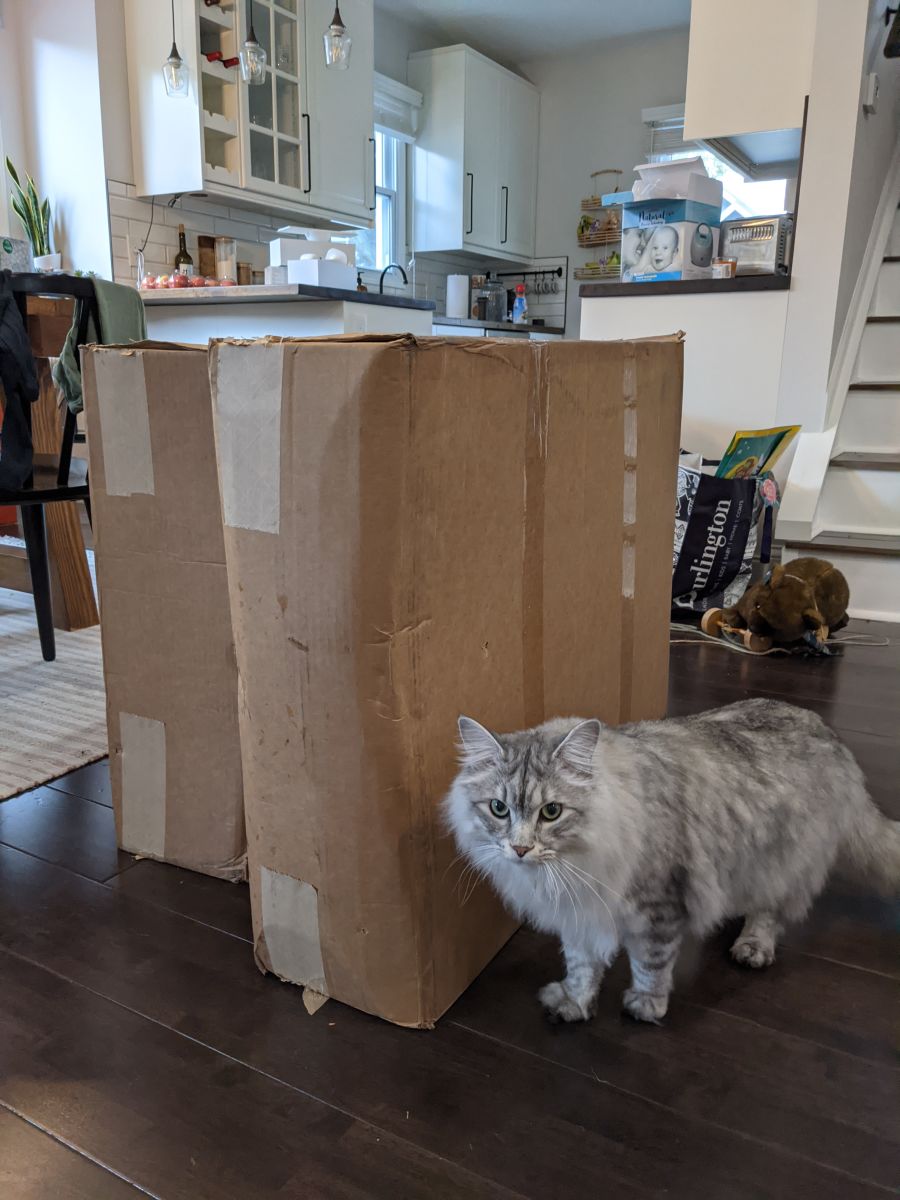
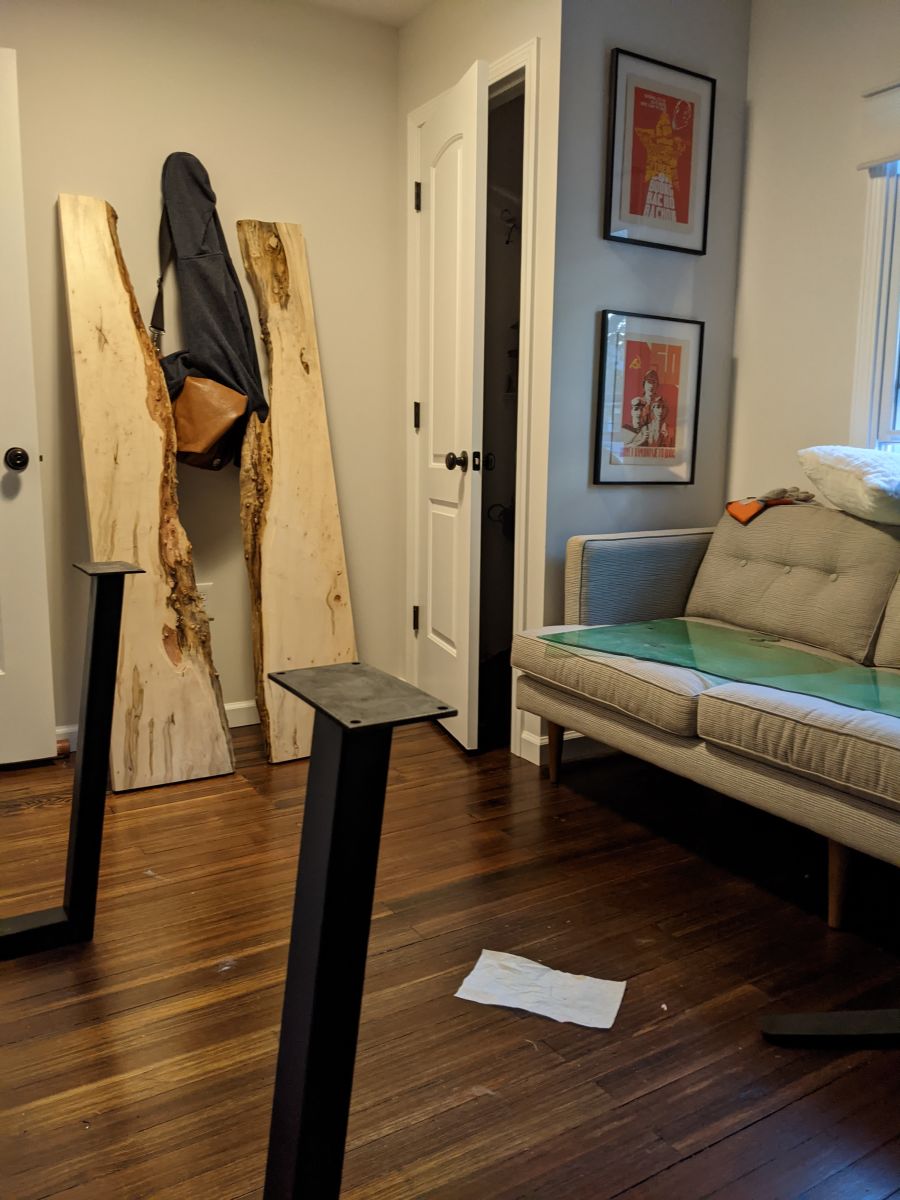
Getting the legs
Another month later, the legs finally arrived. Cat for scale:
They weren’t painted which was another annoying part about the shop I ordered from. After painting it was ready for assembly.
The legs were painted matte black with a few thing coats of acryllic spray paint and then finished with a protective coat.
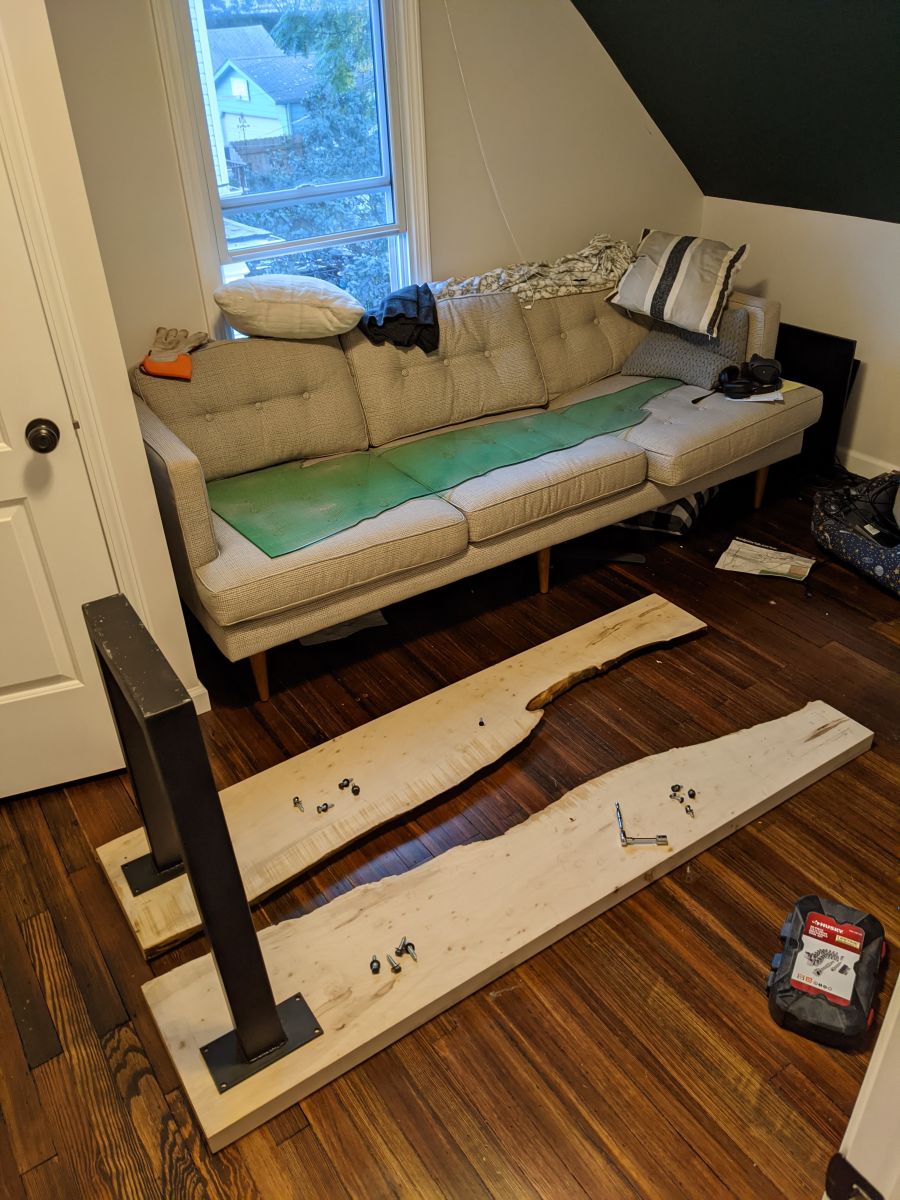
Positioning the legs
Now it’s important that I mention getting the table legs right is absolutely crucial. The legs are ultimately what are holding the wood pieces up in the order level and position to hold the glass in place. There is no glue or silicone holding the glass in the inset I routed out. It’s just gravity.
So for this piece I wanted to “dry fit” all of the pieces together as much as I could. That way I wouldn’t leave up to chance if the legs weren’t square and left a weird gap between the glass & the wood.
Heaven forbid I carry all of these pieces up to my office and on the last step of placing the glass, I come to find out the live edge gap is too small and the glass wouldn’t fit. This was my nightmare. Second only to breaking the glass while carrying it to my office from the garage.
Marking the pilot holes for the leg’s lag screws were not an easy task either. I decided to place the table on saw horses that were slightly taller than the table legs. This made sure I could see the table’s glass was in the right position.
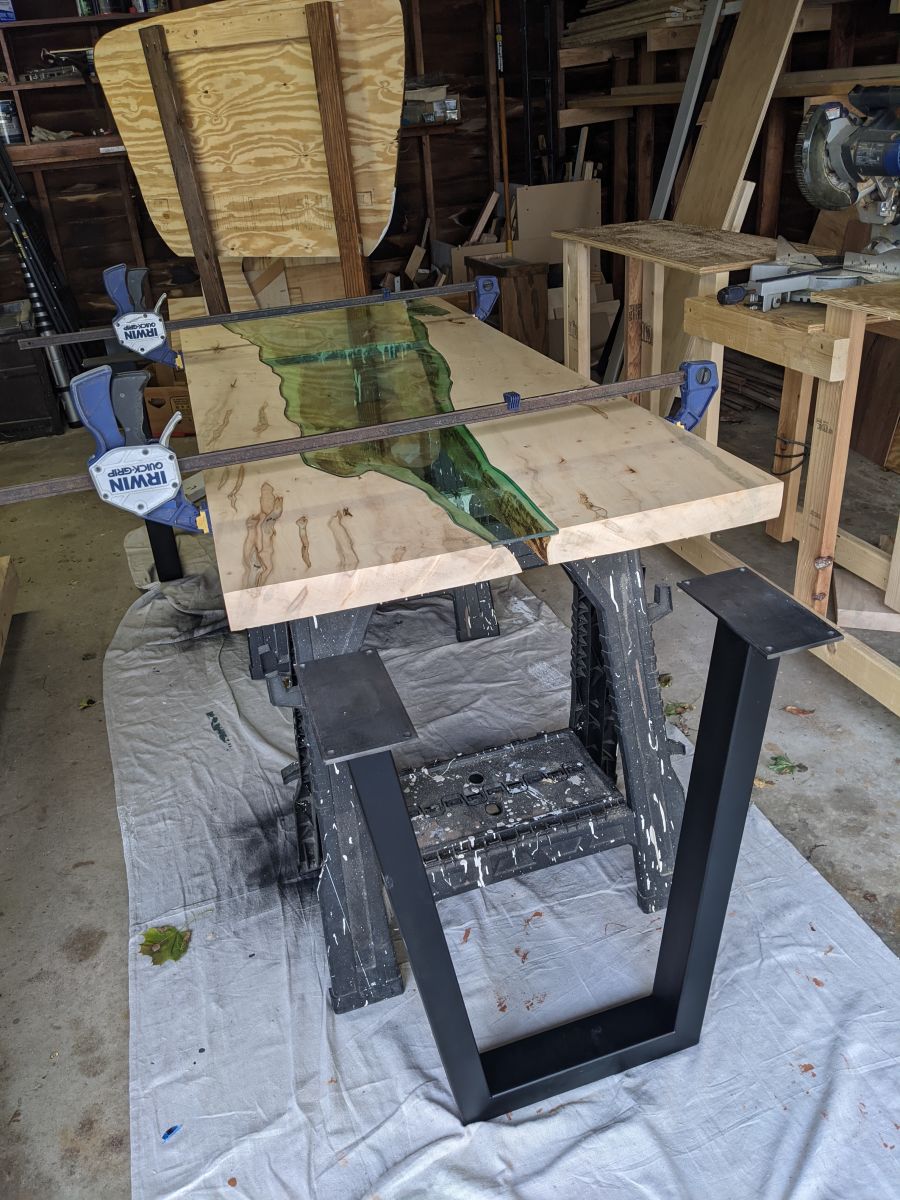
The trouble was these legs were heavy and I could hold them in place while I marked the holes for each leg’s screws.
I marked 2” in from the far edges of the table and the perpendicular side where the legs will set. I held up the table legs as my wife clamped them to the table. She’s the best. Once they were clamped I could pencil in the exact holes.
After the holes were marked, I flipped the wood pieces over and carefully made pilot holes for each of the screws.
Assembly
I wasn’t planning on moving my office into the garage so I needed to move the pieces upstairs to my office for assembly. I was terrified of breaking the glass by banging it against a wall or door during any one of the 5 turns I had to make. But I took my time and my wife helped navigate me.
Once I carried all of the pieces upstairs it was finally, finally time to put this thing together. It has been 11 months since I first wanted to start this project. The end was in sight.
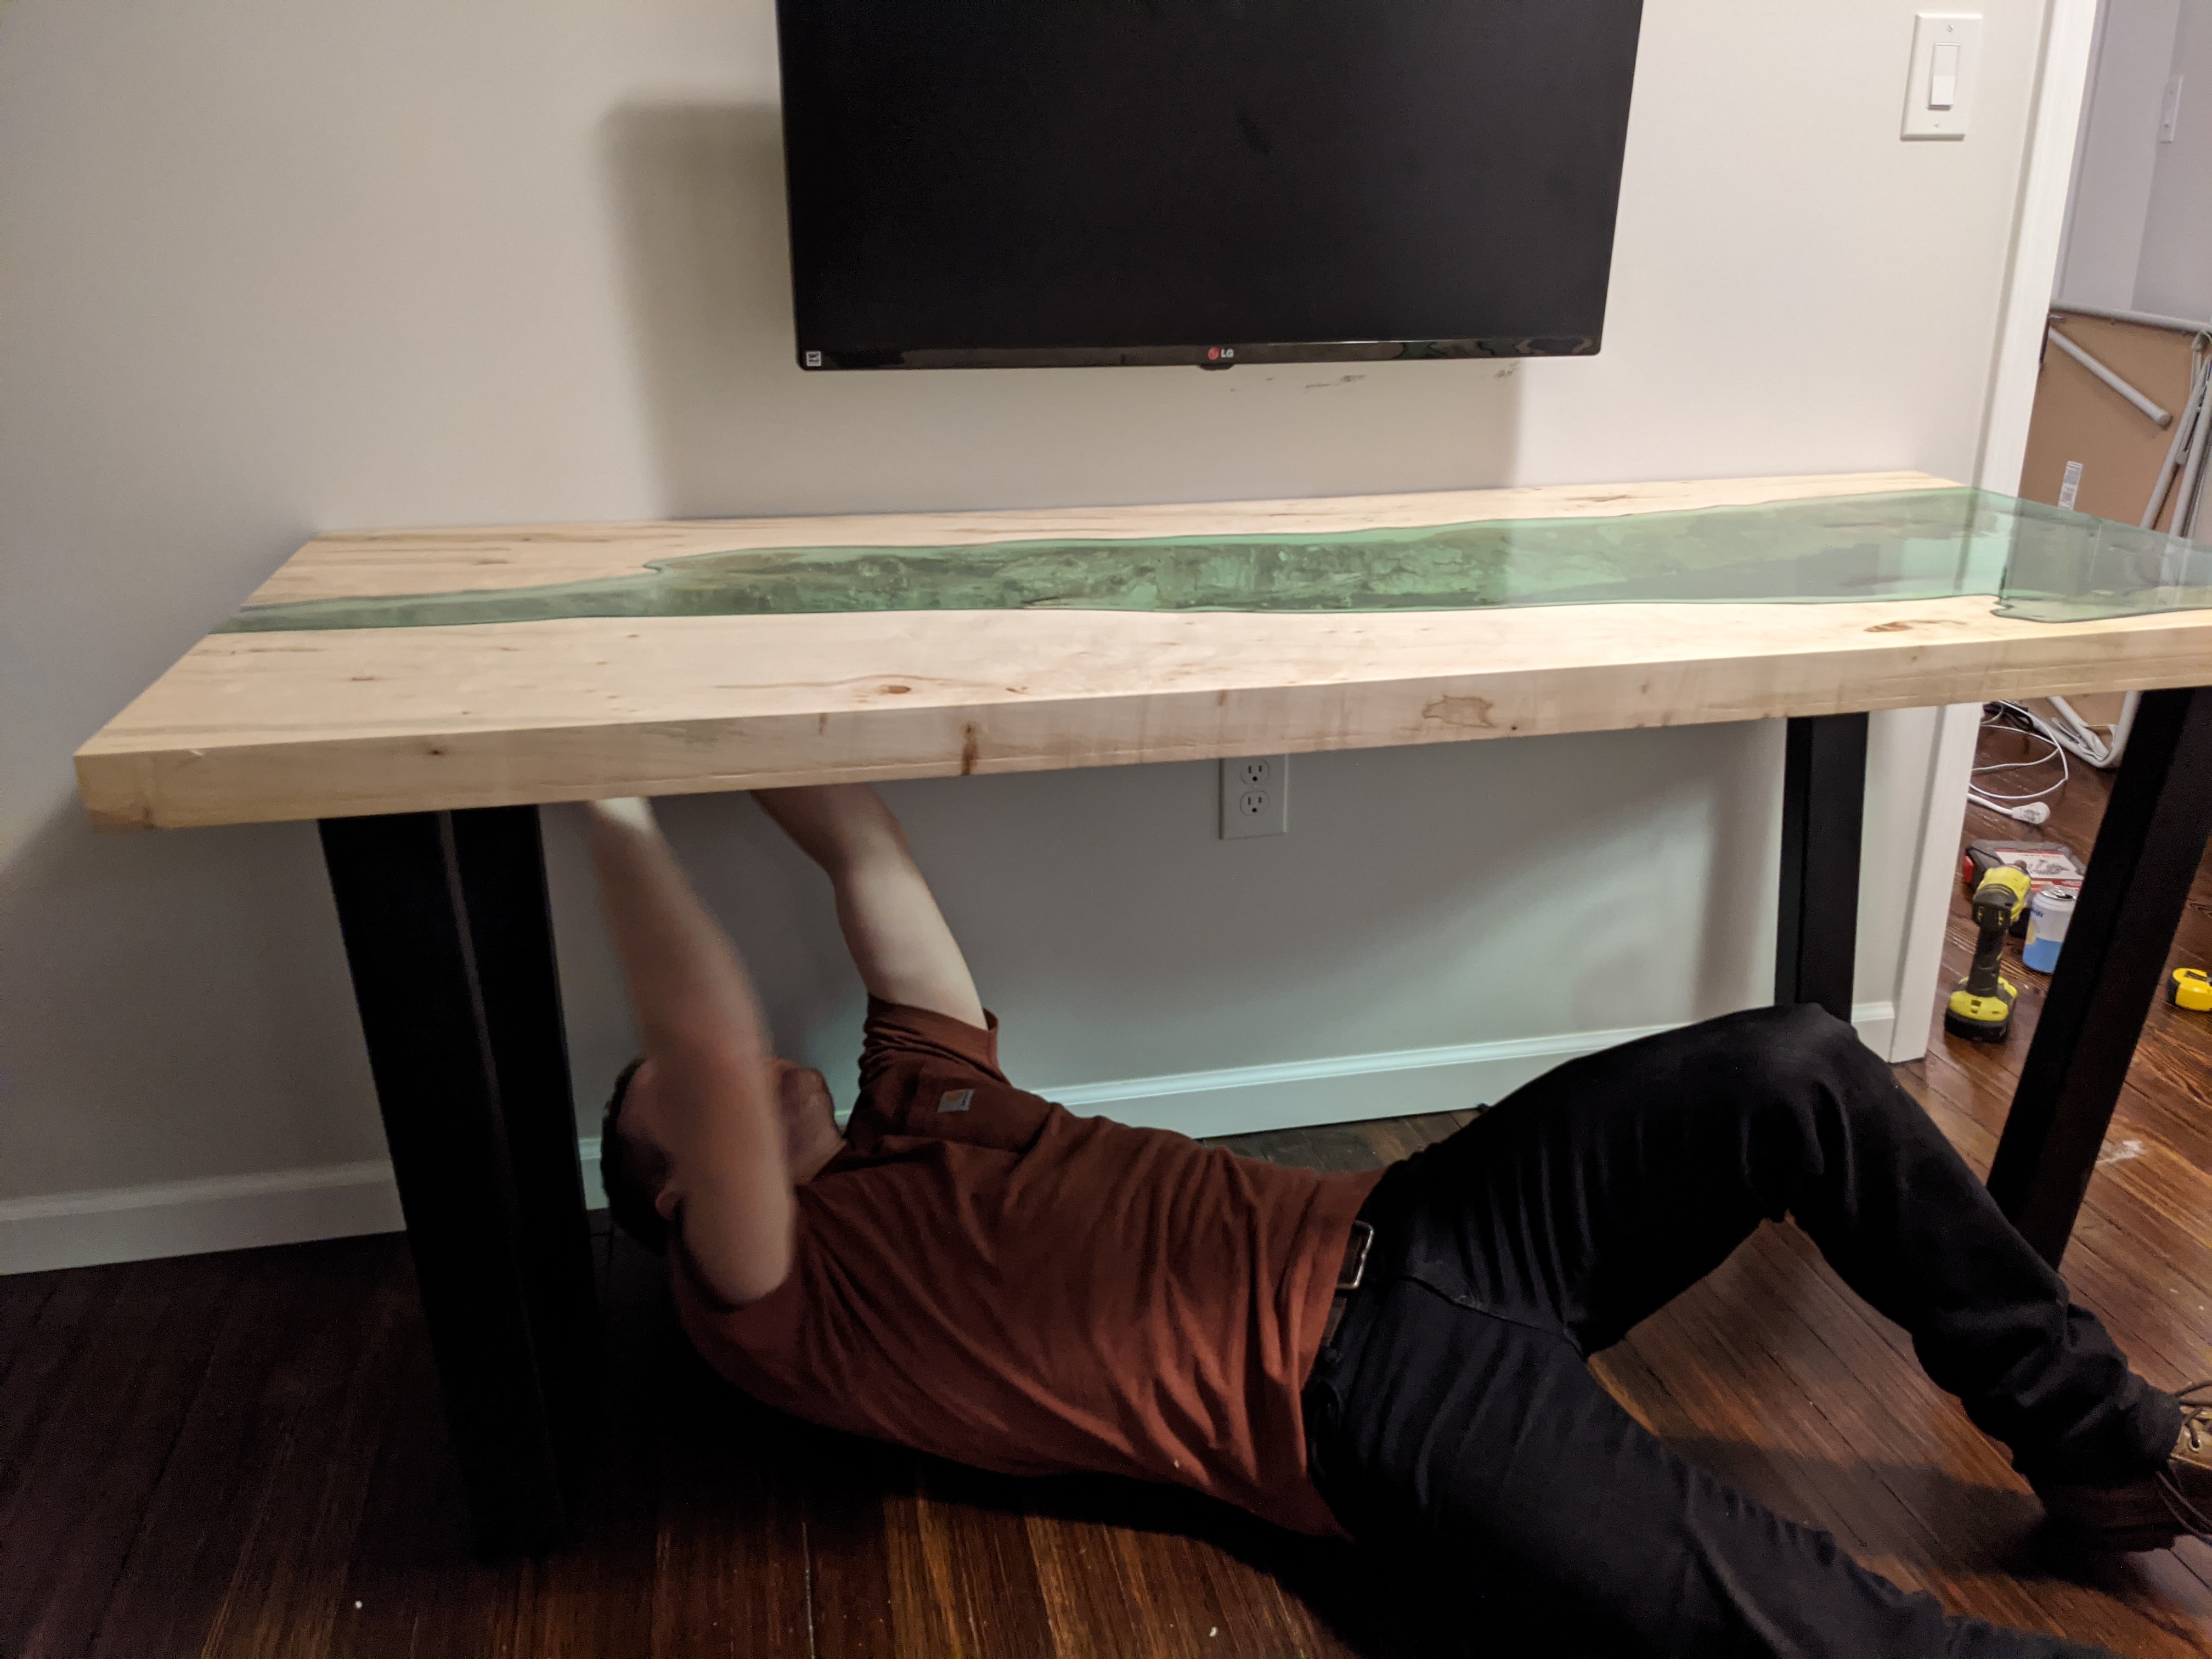
I loosely screwed in a couple lag bolts on each end of the leg. The first bracket of 4 fit pretty good, then 2nd, and the 3rd. But the 4th and final bracket’s holes were at least a 1/2 inch off. There was no chance I could bend this chunky metal leg to fit either.
This is the moment when I realized the table legs weren’t exact matches. On top of that the brackets holes had no measurements to them, the manufacturer just drilled willy nilly wherever they felt like.
Honestly I was mad as hell. Thankfully my wife kept a cooler head and we just decided to keep rotating and switching the table legs in the 16 possible combinations until they matched. It was tedious as it sounds.
So lesson learned, don’t trust a custom fab job’s measurements. Mark the table leg bracket with the corresponding pilot holes during the dry fit stage so you can keep the exact match when it comes time to assemble for real.
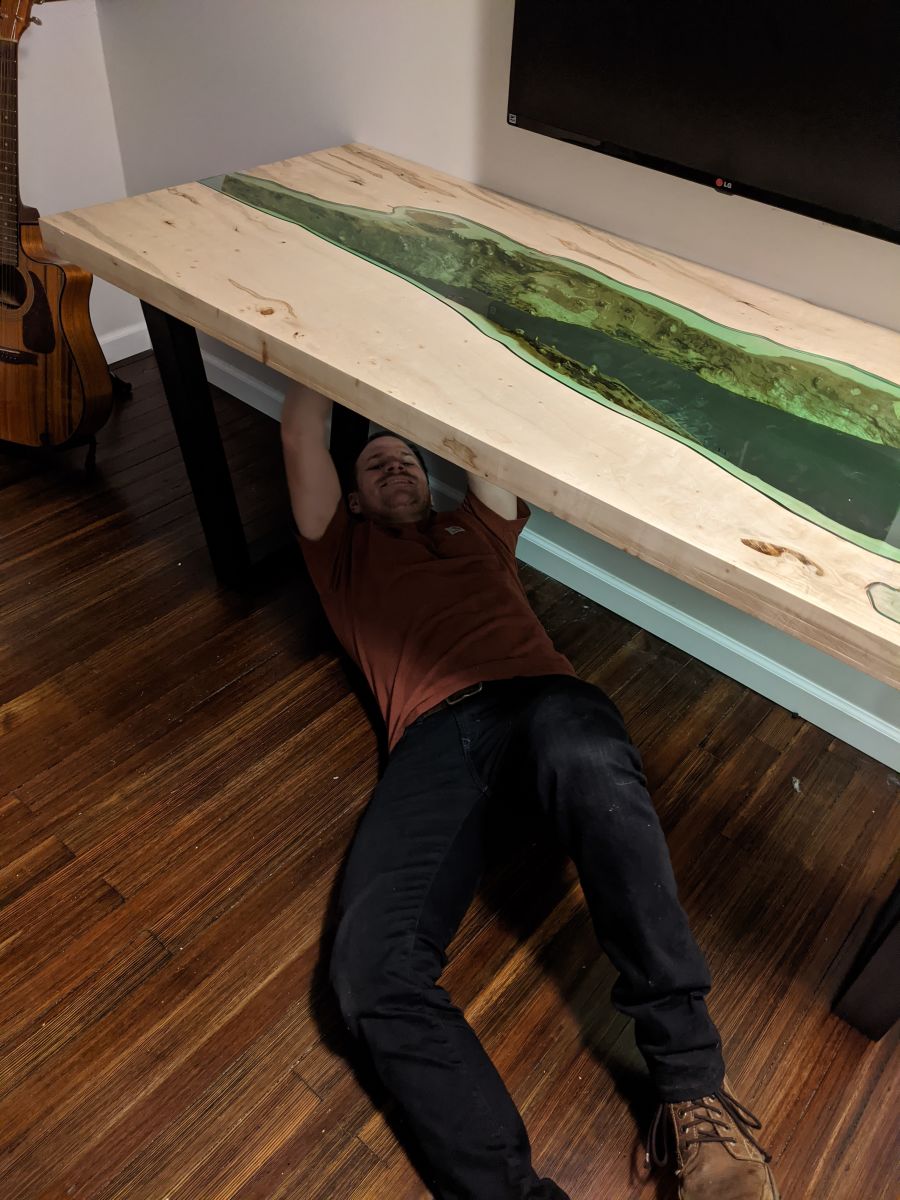
After the setback, I loosely screwed in about half of the lag screws into place. Then we flipped the table over and gingerly placed the glass in place. It was a perfect fit (for an amatuer wood worker)!
Now I could set the rest of the screws in place. After almost a year of designing, coordinating and working I had a river desk of my own.
A nice little upgrade from the card table I was working off of since we moved in, in my humble opinion.

How much did it cost?
| Part | Cost |
|---|---|
| Live Edge Wood Slab | $100 |
| Planing | $40 |
| Custom Glass | $280 |
| Custom Table Legs | $200 |
| Lag Screws, Bolts & Washers | $5 |
| Water based Poly | $10 |
| Total | $535 |
~$10,000 estimated market value - $535 parts code = ~$9,475 saved.
Not including all of the hours designing or building the table, but it wasn’t a small amount I’ll say that. I can see why these desks/tables are so expensive.
Tools list
Below are the tools I used to build the table.
I couldn’t do it without you!
Big thanks to my friends and family that helped me with this project:
- My wife - for pushing me to actually finish what I started with the gentle reminders that I can’t keep working off of a card table forever
- Cam - thanks again for driving my butt around to get my wood planed and glass picked up
- Charlie - for providing this beautiful piece of white maple
- Superior Glass & Mirror - for crafting the custom glass by hand
- Metro Hardwoods - for planing my piece and teaching me about hardwoods. Thanks Dean!
- My Uncle Rick - for guiding me through cutting hardwood without losing a finger